0%

git意义

1.作用

版本控制功能:在本地端记录文件的修改记录,在远程仓库备份内容和版本记录

协同开发控制:保证多人同时开发时,开发内容不会冲突

2.远程仓库的选择

可以选择github gitee等远程仓库储存自己的代码

也可以使用gitlab在本地搭建代码库

git原理

参考: 这才是真正的Git——Git内部原理揭秘! - 知乎 (zhihu.com)

可视化工具: Explain Git with D3 (onlywei.github.io)

1.git项目

对于git管理的项目主要分为两个部分,工作区和git仓库区:

  • 工作区指项目开发的所有文件所在的区域
  • git仓库区则是项目根目录下./.git目录的内容,其中主要记录了git需要的相关信息

​ git主要使用SHA1散列算法将工作区的各文件内容、拓扑信息、修改记录转为git对象储存在git仓库中。而利用散列算法是为了快速比对文件是否相同。

2.git对象

参考: Git(Linux环境):Git对象模型(blob、tree、commit、tag)_NGC_2070的博客-CSDN博客

​ git会对每个加入git仓库(即经过git add后)的文件创建对应的git对象,并且通过散列哈希算法保证文件内容不同时生成的git对象对象名也不同,因此只要文件发生改动,就会生成新的对应git对象

1
2
3
4
5
6
7
8
# 底层指令
# 计算文件 a.txt 对应的SHA1哈希值
>git hash-object .\a.txt
d2676822271b14c11c7892f358937c5f6cacaf00
# 计算文件 a.txt 对应的SHA1哈希值, 并写入./.git/objects保存为blob类型
>git hash-object -w a.txt
# 计算SHA1哈希值,其中stdin 表示从标准输入读取,而不是从本地文件读取
echo "hello" | git hash-object --stdin

2.1 git对象类型

一共有4种数据对象:blob,tree,commit,tag. 他们都被储存于./.git/objects目录中,如下:

1
2
3
4
5
6
7
8
9
### 检视git对象 ###
> tree .\objects\
~\.GIT\OBJECTS
├─6d/d6053564b9e0192b96497d75c7a466449b512b
├─74/8a11ed65b7a52f7bcd0a113868d57adeeb259c
├─be/3772294d07301ab5b182f02cc2d480a04b67d8
├─d2/676822271b14c11c7892f358937c5f6cacaf00
├─info
└─pack

2.1.1 blob对象

​ 存储工作区中被git add指令添加过的具体文件

​ 而一个文件经过多次修改后,每git add 一次,就会在仓库内产生一个新的blob对象。因此 blob 文件就是对原文件内容的全量拷贝,同时前面加了 blob size\0,而文件名称的 hash 值计算是计算整体字符的 SHA-1 值
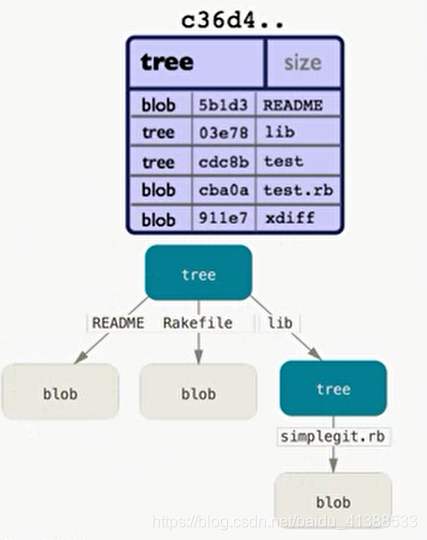
blog

2.1.2 tree对象

​ 储存一串指向其他blob或tree对象的指针,用于表示目录与内容的层次关系

​ 且由于tree指向的也是git对象类型,那么当tree指向工作区同一个文件的
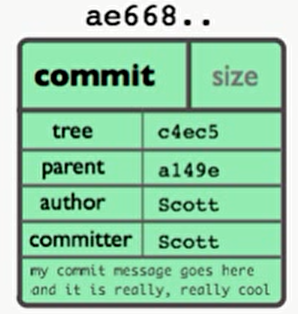
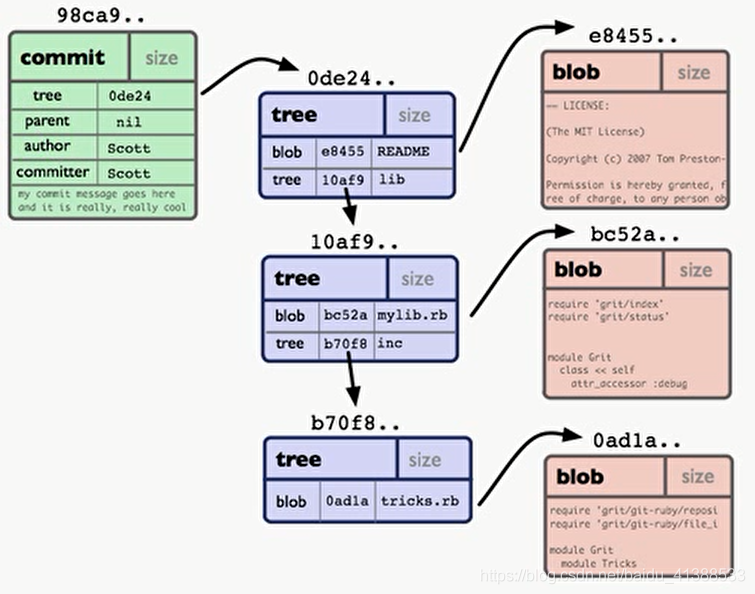
tree

2.1.3 commit对象

​ commit用来指向一个tree对象,标记项目某个特定时间点状态,记录commit时提交的对应信息

​ 指向的tree对象,将指向本次提交对应的所有object, 因此可以认为每个commit就是整个项目的一个快照

commit

commit_demo

2.1.4 tag对象

​ 用来标记某一个提交(commit)

2.2 对象命名规则

用40个字符的字符串用来表示对象名:目录(2个字符)+名(38个字符)

字符串由对象内容做SHA-1哈希计算得来

2.3 查看git对象

因为git对象都是二进制加密后的,因此直接使用cat读取是无法正常读取内容的

git cat-file -t <文件名> 查看git对象类型

git cat-file -p <文件名> 查看git对象内容

1
2
3
4
5
6
7
8
9
10
11
12
13
14
15
16
17
18
19
20
21
22
23
### blob类型 ###
> git cat-file -t 748a
blob
> git cat-file -p 748a
111
> git cat-file -t d267
blob
> git cat-file -p d267
222
### tree类型 ###
> git cat-file -t be37
tree
> git cat-file -p be37
100644 blob d2676822271b14c11c7892f358937c5f6cacaf00 a.txt
100644 blob 748a11ed65b7a52f7bcd0a113868d57adeeb259c b.txt
### commit类型 ###
> git cat-file -t 6dd6
commit
> git cat-file -p 6dd6
tree be3772294d07301ab5b182f02cc2d480a04b67d8
author WilsonGoGo <[email protected]> 1663231965 +0800
committer WilsonGoGo <[email protected]> 1663231965 +0800
first commit

3.工作区与暂存区

​ git将项目划分为工作区、暂存区、本地仓库、远程仓库四部分

工作区:就是实际操作并改动的文件。在VsCode插件中,工作区的文件有以下几种状态:

  • U: untracked, 表示文件刚创建,但是没有通过git add提交到工作区,自然也没有其对应的blob对象对其进行备份
  • M modify, 表示文件发生过,但是没有通过git add提交到工作区,与其之前的blob对象不匹配
  • A tracked, 文件在改动后以及提交到了暂存区,这个文件以及有了对应的blob对象储存其备份信息,在
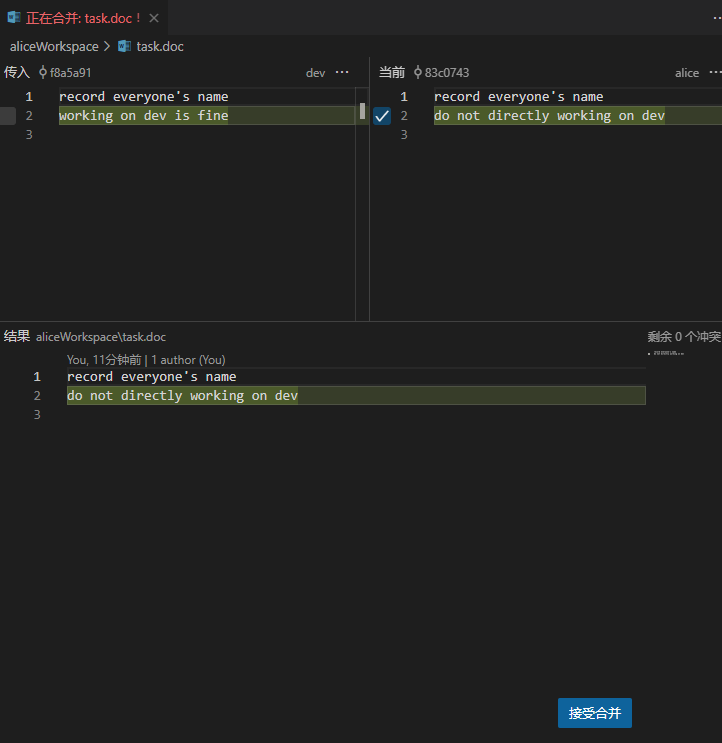
git status中会提示”need to commited”。但是一旦该文件再次发生改动,就会回到untracked状态
  • ! conflict, 表示该文件发生冲突,同时被多个分支修改
  • 其他: 相比当前HEAD指向的快照没有发生变动的文件,在git status中不会提示相关信息

暂存区:指进行过改动,但是没有添加对应的git对象至本地仓库的文件区域,记录于./.git/index文件中

本地仓库:指./.git中储存的各种指针、git对象、提交记录等信息,可以视作工程的快照与文件的修改记录信息,可以用于回滚版本

远程仓库:例如github gitee gitlab等远程用来备份项目的仓库

4.git分支与git指针

​ 每个git分支都有一个指针,他会指向当前分支的最新快照,也就是指向最新commit提交给当前分支的那个commit对象。其中,各分支的指针储存在./.git/refs/heads/<分支名>中;而各分支指针指针的改动历史则储存在./.git/logs/refs/heads/<分支名>

1
2
3
4
5
6
7
8
9
10
11
12
13
14
15
16
17
18
19
20
21
# 分支对应指针
# 注:当前有master和dev两个分支
> ls ./.git/refs/heads/
Mode LastWriteTime Length Name
---- ------------- ------ ----
-a---- 2022/9/15 19:50 41 dev
-a---- 2022/9/15 16:52 41 master
> cat .\dev
6dd6053564b9e0192b96497d75c7a466449b512b
> cat .\master
6dd6053564b9e0192b96497d75c7a466449b512b
# 分支指针记录
> ls ./.git/logs/refs/heads/
Mode LastWriteTime Length Name
---- ------------- ------ ----
-a---- 2022/9/15 19:50 170 dev
-a---- 2022/9/15 16:52 173 master
> cat dev
0000000000000000000000000000000000000000 6dd6053564b9e0192b96497d75c7a466449b512b WilsonGoGo <[email protected]> 1663242644 +0800 branch: Created from master
> cat master
0000000000000000000000000000000000000000 6dd6053564b9e0192b96497d75c7a466449b512b WilsonGoGo <[email protected]> 1663231965 +0800 commit (initial): first commit

​ 除了git分支的指针外,还有HEAD指针,HEAD指针永远指向最近一次commit提交对应的commit对象。HEAD指针存储在./.git/HEAD中,HEAD指针的历史记录储存在./.git/logs/HEAD

1
2
3
4
5
6
# HEAD指针内容
~\.git> cat HEAD
ref: refs/heads/master
# HEAD指针记录
~\.git\logs> cat HEAD
0000000000000000000000000000000000000000 6dd6053564b9e0192b96497d75c7a466449b512b WilsonGoGo <[email protected]> 1663231965 +0800 commit (initial): first commit

5.git的垃圾回收gc

​ 经过多次的commit后,git对象中可能有多个blob或tree类型已经是指针不可达的状态,这时候git gc命令可以用于回收这些不可用的git对象

​ 如果存储库中的松散对象太多或包装太多,则需要进行内务处理。如果松散对象的数量超过了gc.auto配置变量的值,则所有松散对象都将使用组合到一个包中git repack -d -l

1
2
# 清理不必要的文件并优化本地存储库
git gc

git仓库组成

文档: Git - gitrepository-layout Documentation (git-scm.com)

参考: .git文件夹探秘,理解git运作机制-阿里云开发者社区 (aliyun.com)

1.仓库区./git/

执行ls -Fl .git 可以看到.git目录内结构如下

1
2
3
4
5
6
7
8
9
10
11
12
COMMIT_EDITMSG
HEAD
ORIG_HEAD
FETCH_HEAD
config
description
index
hooks/
info/
logs/
objects/
refs/

文件 COMMIT_EDITMSG

​ 此文件是一个临时文件,存储最后一次提交的信息内容,git commit 命令之后打开的编辑器就是在编辑此文件,而你退出编辑器后,git 会把此文件内容写入 commit 记录。

实际应用:

​ git pull 远程仓库后,新增了很多提交,淹没了本地提交记录,直接 cat .git/COMMIT_EDITMSG 就可以弄清楚最后工作的位置了

文件 HEAD

分支HEAD:通常情况下, HEAD 存储一个分支的 ref,运行:cat .git/HEAD 通常会显示如下,这说明你目前正在 master 分支工作。此时你的任何 commit,默认自动附加到 master 分支之上。

1
ref: refs/heads/master

孤立HEAD:但是当使用过git checkout <commit id>后,会提示如下。这代表HEAD 这个文件中存储的信息已不再是一个分支信息,而是指向一个commit对象。

1
You are in 'detached HEAD' state. You can look around, make experimental changes and  commit them, and you can discard any commits you make in this state without impacting any branches by performing another checkout. ```

文件 ORIG_HEAD

此文件会在你进行危险操作时备份 HEAD,如以下操作时会触发备份:

1
2
3
4
git reset
git merge
git rebase
git pull

如果需要通过该备份还原,则可以执行git reset --hard ORIG_HEAD # 慎用

文件 FETCH_HEAD

此文件用于追踪远程分支的拉取与合并,例如在使用git pull命令时,其实就是先将远程仓库的HEAD同步到该文件中,然后再将其merge至HEAD指针(注,merge前会将HEAD备份至ORI_HEAD)

文件 config

此文件储存项目本地的配置信息,示例如下:

1
2
3
4
5
6
7
8
9
10
11
12
13
14
15
16
17
18
19
20
21
22
23
24
25
#[core] 段的内容跟 git config 命令对应
[core]
repositoryformatversion = 0
filemode = true
bare = false
logallrefupdates = true
ignorecase = true
# 用户信息通过git config --local user.xxx <value>来配置,如果没有配置,则使用git全局配置的信息
[user]
name = abc
email = [email protected]
# remote 记录远程仓库的信息
[remote "origin"]
url = [email protected]/xxx.git
fetch = +refs/heads/*:refs/remotes/origin/*
# branch 表示分支同步设置
[branch "master"]
remote = origin
merge = refs/heads/master
[branch "v2.6.0"]
remote = origin
merge = refs/heads/v2.6.0
[branch "v2.8.0"]
remote = origin
merge = refs/heads/v2.8.0

文件 description

说明这个文件主要用于 GitWeb 的描述,如果我们要启动 GitWeb 可用如下命令:

1
2
# 确保lighttpd已安装: brew install lighttpd
git instaweb --start # 默认会启动 lighttpd 服务并打开浏览器 http://127.0.0.1:1234

文件 index

​ 该文件设计负载,简单来讲这个文件也叫做 git 的暂存区(Staging Area),git add 就是把工作区内的某些文件取部分 stat 抓取的内容并写入 .git/index 文件并存为相应的一条 index entry,多条 index entry 形成一个 tree。

  • git commit 是把上一步形成的 tree 结构及相应的 blob 存储到 objects/ 文件夹下并同时生成一条 commit 记录。

  • git reset 是将刚写入 index 文件的 tree 丢弃,并从 HEAD 中恢复一个 tree。

  • git status 是拿 index 文件中存储的 tree 与工作区内的文件在 stat 层面做对比,并输出变更。

参考: git/racy-git.txt at master · git/git (github.com)

目录 hooks

存放 git hooks,用于在 git 命令前后做检查或做些自定义动作

参考:https://git-scm.com/docs/githooks

目录 info

  • 文件 info/exclude 用于排除规则,与 .gitignore 功能类似。
  • 文件 info/refs (可能包含),用于跟踪各分支的信息。一般通过命令 git update-server-info 生成

目录 logs

​ 存放操作信息记录信息,包括了HEAD指针与各分支指针的记录值

目录 objects

​ 该目录下存储了所有的git对象,

​ 该目录下还有pack路径:由于每次 commit 都会生成许多 hash文件,并且由于 blob 文件都是全量存储的,导致 git 效率下降,于是有了 pack-format,优势:对于大仓库存储效率高;利于网络传输,便于备份;增量存储,优化磁盘空间

该目录下还有info路径:储存关于git对象的额外信息

目录 refs

​ heads目录:存放各分支的指针信息

​ tags目录:存放任意git对象名

安装git

1.windows系统

官网下载对应应用程序安装即可

2.linux系统

centos yum -y install git

ubuntu apt-get install git

配置信息

1.配置用户信息

1
2
3
4
5
6
# 设置全局参数
git config --global user.name <用户名>
git config --global user.email <邮箱>
# 设置仓库内参数
git config --global user.name <用户名>
git config --global user.email <邮箱>

仓库创建

1.本地初始化仓库

1
2
3
4
5
6
7
8
9
10
11
12
13
14
15
16
17
18
19
20
21
# 把当前目录初始化为仓库
git init
### 路径管理 ###
# 在当前目录下创建 ./仓库名 路径用于存储仓库
git init <仓库名>
### 分支管理 ###
# 设置初始分支名,默认为master
-b <branch-name>
### 权限管理 ###
# 设置仓库的访问权限
--shared[=(false|true|umask|group|all|world|everybody|<perm>)]
# umask false # 默认选项
# 各用户获得其umask对应的权限(存疑?)
# 具体参考https://blog.csdn.net/Doudou_Mylove/article/details/118384471
# 例:root的umask为022,其创建目录时对应权限为777-022=755,创建文件时对应权限为666-022=644
# group true
# 当前用户组拥有读写权限
# all world everybody
# 任意用户拥有读权限,其他权限与group类型相同
# <perm>
# (存疑?)

2.从远程拉取仓库

1
2
3
4
# 拉取仓库
git clone <仓库地址>
# 拉取指定分支
git clone --branch <分支名> --single-branch <仓库地址>

本地仓库管理

1.暂存区管理

1
2
3
4
5
6
7
8
9
10
11
12
13
14
# 将<文件名>文件添加至暂存区(即index文件中)
git add <filename>
# 将匹配.append后缀的所有文件添加至暂存区
git add *.append
# 添加所有文件至暂存区
git add .
# 恢复目标文件至上次 git add 的状态
git restore <file>
# 从暂存区中撤销目标文件,但是不修改其在工作区的状态
git restore --staged <file>
# 从工作区和暂存区中删除文件
git rm <filename>
# 从工作区中移动或重命名一个文件、目录或symlink,并在完成后将变动更新至暂存区
git mv <filename>

2.提交快照至本地仓库

1
2
3
# 将暂存区文件提交至本地仓库
# 注:commit相当于为项目创建一个快照,它会在本地仓库生成一个commit对象储存相关快照信息,并更新它所指向的tree, blob对象,从而形成一个与commit快照对应的完整项目备份
git commit -m "message"

3.回退版本

1
2
3
4
5
6
7
8
9
10
11
12
13
14
15
16
17
18
19
20
21
22
23
24
25
26
27
28
29
30
31
32
33
34
35
36
37
38
39
40
### git reset ###
# 取消暂存区的所有变动,但是保留工作区变动
# 即,取消上次git commit后的所有git add操作
git reset HEAD
# 回到上一个版本
git reset HEAD^
# 回退至指定commit版本,并将HEAD指向这个commit版本
git reset <commit id>
# git reset 的行为模式
git reset --soft # 不修改暂存区和工作区的内容,只讲HEAD指向目标commit
git reset --mixed # [默认模式] 重置暂存区,不重置工作区
git reset --hard # 重置暂存区
# 对工作区的文件,恢复至目标commit的状态
# 即,未被其他commit保存的文件修改进度将丢失
git reset --merge # 重置暂存区
# 对工作区中的文件,如果其与暂存区和目标commit中均不相同,不会重置
# 即,某文件如果没有对应的git对象(即未备份或修改后未git add),不重置
git reset --keep # 重置暂存区
# 对工作区的文件,如果某文件与HEAD和目标commit都不相同,终止reset操作
# 即,某文件如果没有对应的git对象(即未备份或修改后未git add),终止操作

### git revert ###
# 撤销当前branch的上一次的commit对应操作
git revert
git commit -m "message about this revert"
# 注:
# 1. revert相当于用一个新的commit来抵消上一次commit做出的改变
# 2. revert操作导致HEAD指针在当前branch上前进;reset操作导致HEAD指针在当前branch上后退
# revert后的branch是:A->B->C => A->B->C->C'
# reset后的branch是:A->B->C => A->B
# 3. 因此在日后的merge操作时因为git revert是用一次逆向的commit“中和”之前的提交,因此日后合并老的branch时,导致这部分改变不会再次出现
# 下图示例中,f'是对f的revert操作(抵消了d e),因此对于最终合并得到的i,不会包含d e对应的变动
# master a -> b -> c -> f -> f' -> i
# \ / /
# dev d -> e -> g -> h
# 4. 但是git reset是之间把某些commit在某个branch上删除,因而和老的branch再次merge时,这些被回滚的commit应该还会被引入。
# 综上所述,git reset一般用于在本地中回滚版本;git revert则用于撤销已经push的操作,因为这样可以避免远程仓库的回滚和push --force命令的使用
# 撤销目标commit对应的操作
git revert <commit id>
git commit -m "message about this revert" # revert操作也需要对应的commit信息

4.检视命令

1
2
3
4
5
6
7
8
9
10
# 查看仓库当前状态,显示与HEAD指向的快照相比发生变化的文件
git status
# 比较工作区文件与暂存区文件的差异
git diff
# 比较工作区文件和某个commit快照的差异
git diff HEAD
git diff <branch name>
git diff <commit id>
# 查看commit的详细信息
git show <commit id>

同步管理

1.分支管理

1
2
3
4
5
6
7
8
9
10
11
12
13
14
15
16
17
18
19
20
21
22
23
24
25
# 查看本地分支
git branch
git branch -r # 查看远程分支
git branch -a # 查看本地分支以及远程分支
git brance -vv # 查看本地分支与远程分支的关联关系
# 创建分支
git branch <new branch> # 基于当前分支创建新分支
git branch <new branch> <origin branch> # 基于目标分支创建新分支
git branch <new branch> <repoName>/<origin branch> # 基于远程仓库的分支创建新分支
# 删除branch
git branch -d <branchName>
# 重命名分支
git branch -m <old branch> <new branch>
# 切换至目标分支
git checkout <branchName> # 切换至已有分支
git checkout -b <branchName> # 创建并切换至目标分支
git switch <branchName> # switch将来可能会替代checkout实现切换分支,且如果分支不存在会自动创建

# 检查远程仓库分支
git branch -r
# 同步远程仓库标签至本地
git remote update <repoName> -p* # 更新远程仓库分支列表
# 推送分支至远程仓库
git push <repoName> <local branch>:<repo branch> # 将本地<local branch>分支合并至远程的<repo branch>分支
git push origin --delete <branchName> # 删除远程仓库的<branchName>分支

2.标签管理

标签即一条分支上某个commit的别名,需要使用该commit id时均可以使用其对应的tag名作为替代

1
2
3
4
5
6
7
8
9
10
11
12
13
14
15
# 查看所有标签
git tag
git tag -ln # 显示标签名以及描述信息
# 为目标commit创建标签
git tag <tagName> # 对当前指向的commit创建标签
git tag <tagName> <commit id>
# 删除本地标签
git tag -d <tagName>
# 切换至目标标签
git checkout <tagName>

# 推送标签至远程仓库
git push <repoName> <tagName> # 将本地目标tag推送至远程仓库
git push <repoName> --tags # 将本地所有tag推送至远程仓库
git push <repoName> :refs/tags/<tagName> # 在远程仓库删除目标标签

远程仓库管理

1.关联远程仓库

1
2
3
4
5
6
# 添加远程仓库,并命名为origin
git remote add origin <repo address>
# 重命名远程仓库
git remote rename <old> <new>
# 删除远程仓库
git remote add <repoName>

2.同步操作

拉取相关

1
2
3
4
5
6
7
8
9
10
11
12
# 以下操作中,均以origin指代远程仓库 
### fetch ###
# 从远程仓库获取代码库
git fetch <repoName>
### pull ###
# 注:
# pull命令其实就是先执行fetch命令获取目标远程分支信息,再与本地目标分支执行merge命令
git pull # 从远程仓库获取代码库,并将远程仓库的HEAD合并到本地HEAD
git pull <repoName> <branchName> # 远程<repo branchName>分支 合并至 本地当前分支
git pull <repoName> <repo branch>:<local branch> # 远程<repo branch>分支 合并至 本地<local branch>分支
git pull <repoName> <repo branch>:<local branch> --rebase # 即fetch结束后用rebase命令替换merge命令

推送相关

1
2
3
4
5
6
7
8
9
10
11
12
13
14
### push ###
# 将本地仓库HEAD合并到远程仓库的HEAD
git push origin master # 将本地master分支推送至远程master分支
git push <repoName> :<branchName> # 删除远程branchName分支
git push <repoName> <local branch>:<repo branch> # 将本地<local branch>分支合并至远程的<repo branch>分支
# -u用于设置默认主机
# 注:
# 如果当前分支与多个主机存在追踪关系,则可以使用-u选项指定一个默认主机,这样后面就可以不加任何参数使用git push
# 下面命令将本地的master分支推送到origin主机,同时指定origin为默认主机,后面就可以不加任何参数使用git push了
git push -u origin master
# 将本地所有分支都推送至远程仓库对应分支,如果没有对应分支,则创建对应分支
git push --all origin
# 强行推送至远程仓库
git push --force origin

冲突管理

1.合并分支-merge

1
2
3
4
5
6
7
8
9
# 合并分支
git merge <branchName>
# 注:
# git merge topic
# A---B---C topic
# / \
# D--E--F--G--(ABC)--H master(当前分支)
# 执行命令后,将在master分支上的G状态,重新按照A->B->C的顺序执行相应改动至G上
# 最终产生合并后的commit快照H

2.分支换基-rebase

1
2
3
4
5
6
7
8
9
10
11
12
13
14
15
# git rebase命令可以将一个分支的基变更至另一个分支上
git rebase <branch for new base> <branch need rebase>
# 注:
# A---B---C <branch need rebase> feature
# /
# D--E--F--G <branch for new base> base
# 经过rebase后
# D--E--F--G(base)--A'--B'--C'(feature)
# 其原理是,将feature分支上的A B C逐个应用到base分支的G上
# 如果某一步出现冲突,就像merge一样手动解决冲突即可
# 当出现冲突或其他原因导致rebase操作暂停时,可以使用以下指令决定下一步操作
git rebase --continue | --skip | --abort | --quit | --edit-todo
# --continue 手动解决冲突后,执行该操作以将feature分支中下一个commit应用至base分支
# --skip 执行该操作以跳过feature分支中下一个commit的应用
# --abort

子仓库管理

1.添加子仓库

1
2
3
4
5
# 执行以下命令为当前工程添加子模块
git submodule add <仓库地址> <路径>
# <仓库地址> 是仓库的远程地址
# <路径> 是子模块要存放与当前仓库的目标路径
# 命令执行完成后,会在当前工程根路径下生成一个名为“.gitmodules”的文件,其中记录了子模块的信息。添加完成以后,再将子模块所在的文件夹添加到工程中即可。

2.删除子仓库

1
2
3
# 首先前往.gitmodules文件中删除相关子仓库的配置内容
# 再执行以下命令从git仓库删除子模块
git rm –cached

3.加载子仓库

1
2
# 当使用git clone下来的工程中带有submodule时,初始的时候,submodule的内容并不会自动下载下来的,需要执行下面命令加载
git submodule update --init --recursive

工作区常用git文件

.gitkeep文件

​ 由于git无法追踪空文件夹,需要在git中保留某空目录时,可以在目录下新建一个.gitkeep文件,保证git仓库不会忽略该空目录

.gitignore文件

​ 项目中许多临时生成的文件不需要被git仓库追踪,因此通过在某目录的.gitignore文件中写入规则,帮助git忽略对这个目录下某些命名方式文件的追踪,以下是示例语法:

1
2
3
4
5
6
7
8
9
10
11
12
13
14
15
16
17
18
19
20
21
22
23
# gitignore基本语法
# 用#表示注释
# 用*表示匹配0个或任意多个字符
# 生效范围是.gitignore文件所处目录下的所有子目录

# 忽略特定目录
/node_modules

# 忽略特定名称文件
config.ini # 忽略所有名为config.ini的文件
doc/*.txt # 忽略doc/notes.txt但不包括 doc/server/arch.txt
/TODO # 仅忽略项目根目录下的 TODO 文件,不包括 subdir/TODO

# 忽略特定后缀名的所有文件
*.log
*.o
!main.o # 表示main.o除外

# 忽略所有文件
!.gitkeep

# 注:
# push之后创建的.gitignore文件将不在生效

.gitattributes

参考: .gitattributes 作用详细讲解(git大佬必会技能)_StarJava_的博客-CSDN博客_gitattributes

​ gitattributes 是一个文本文件,文件中的一行定义一个路径的若干个属性,主要用于定义每种文件的属性,以方便 git 帮我们统一管理

1
2
3
4
5
6
7
8
9
10
11
12
13
14
15
16
17
18
19
20
21
22
23
### 基本格式 ###
# 匹配的文件模式 属性1 属性2 ...
### 可设置属性 ###
# text 视为文本文件
# -text 不视为文本文件
# eol=lf 行末字符(eol)为lf————入库时将行尾规范为LF(回车),检出时行尾不强制转换为CRLF(换行、回车)
# eol=crlf 行末字符(eol)为crlf入库时将行尾规范为LF(回车),检出时将行尾转换为CRLF(换行、回车)
# diff 强制视为文本文件,即使它包含一些通常从不会出现在文本文件的字节值,例如NUL
# !diff 表示为非文本文件,没有设置diff属性的路径会生成differ二进制文件(如果启用了二进制补丁,会生成二进制补丁)

### 常用语法 ###
# 定义js jsx json后缀名的文件,其
*.js eol=lf
*.jsx eol=lf
*.json eol=lf
# 对于txt后缀的文件,标记为文本文件
*.txt
# 对于sh后缀的文件,标记为文本文件,并规定其行末字符(eol)为lf
*.sh text eol=lf
# 对于vcproj后缀的文件,标记为文本文件,并规定其行末字符(eol)为crlf
*.vcproj text eol=crlf
# 对于jpg后缀的文件,标记为非文本文件
*.jpg -text

参考: Git 原理入门 - 阮一峰的网络日志 (ruanyifeng.com)

示例一:创建仓库

初始化仓库

1
2
3
4
5
6
7
8
9
10
11
12
13
14
15
16
17
18
19
20
# 进入目标目录
PS ~> cd .\aliceWorkspace\
# 初始化当前目录为新git仓库
PS ~\aliceWorkspace> git init
Initialized empty Git repository in E:/个人文件归档/笔记-博客文档/软件学习/git/demoforgit/aliceWorkspace/.git/
# 检查仓库目录
PS ~\aliceWorkspace> tree .\.git\
├─hooks
├─info
├─objects
│ ├─info
│ └─pack
└─refs
├─heads
└─tags
# 检查git仓库状态
PS ~\aliceWorkspace> git status
On branch master
No commits yet
nothing to commit (create/copy files and use "git add" to track)

配置仓库参数

1
2
3
4
5
6
7
8
9
10
11
12
13
14
15
16
17
18
19
20
21
22
23
24
25
# 原始./.git/config内容
[core]
repositoryformatversion = 0
filemode = false
bare = false
logallrefupdates = true
symlinks = false
ignorecase = true

# 设置目标远程仓库地址
PS ~\aliceWorkspace> git remote add origin
[email protected]:WilsonGoGo/gitLearning.git
# 对应./.git/config中内容
[remote "origin"]
url = [email protected]:WilsonGoGo/gitLearning.git
fetch = +refs/heads/*:refs/remotes/origin/*

# 设置当前仓库用户名与邮箱
PS ~\aliceWorkspace> git config user.name "WilsonGoGo"
PS ~\aliceWorkspace> git config user.email
"[email protected]"
# 对应./.git/config中内容
[user]
name = WilsonGoGo
email = [email protected]

示例二:简单提交

修改工作区

1
2
3
### 指令部分 ###
# 创建文件
PS ~\aliceWorkspace> echo "repo inited" > README.md
1
2
3
4
5
6
7
8
9
10
11
12
### 原理部分 ###
# 检查git仓库状态,可以看到提示新文件README.md未被追踪
PS ~\aliceWorkspace> git status
On branch master
No commits yet
Untracked files:
(use "git add <file>..." to include in what will be committed)
README.md
# 检查git仓库的git对象,也没有README.md对应的git对象
~\aliceWorkspace> tree .\.git\objects\
├─info
└─pack

提交暂存区

1
2
3
### 指令部分 ###
# 提交刚刚的文件至暂存区
PS ~\aliceWorkspace> git add .\README.md
1
2
3
4
5
6
7
8
9
10
11
12
13
14
15
16
17
### 原理部分 ###
# 检查git仓库状态
PS ~\aliceWorkspace> git status
On branch master
No commits yet
Changes to be committed:
(use "git rm --cached <file>..." to unstage)
new file: README.md
# 检查git对象
PS ~\aliceWorkspace> tree .\.git\objects\
├─01/ccc646d113420d128301639686e16799ece787
├─info
└─pack
PS ~\aliceWorkspace> git cat-file -t 01cc
blob # 该对象是blob类型,说明其实某文件的备份
PS ~\aliceWorkspace> git cat-file -p 01cc
ÿþrepo inited # 该blob对象储存的内容就是之前写入README.md的内容

移除暂存区

1
2
3
4
5
6
7
8
9
### 指令部分 ###
# 想把刚刚加入暂存区的README.md移除
PS ~\aliceWorkspace> git rm .\README.md
error: the following file has changes staged in the index:
README.md
(use --cached to keep the file, or -f to force removal)
# 由于刚刚已经提交
PS ~\aliceWorkspace> git rm --cached .\README.md
rm 'README.md'
1
2
3
4
5
6
7
8
9
10
11
12
13
### 原理部分 ###
# 检查git对象,发现之前README.md对应的blob对象仍然存在
PS ~\aliceWorkspace> tree .\.git\objects\
├─01/ccc646d113420d128301639686e16799ece787 # blob,内容是首次add的README.md
├─info
└─pack
# 检查状态,该文件又恢复至untracked状态
PS ~\aliceWorkspace> git status
On branch master
No commits yet
Untracked files:
(use "git add <file>..." to include in what will be committed)
README.md

再次修改

1
2
3
4
5
### 指令部分 ###
# 重新修改文件内容
PS ~\aliceWorkspace> echo "repo inited --wilson" > .\README.md
# 再次提交
PS ~\aliceWorkspace> git add .\README.md
1
2
3
4
5
6
7
8
9
10
11
12
13
14
15
16
17
18
19
20
21
22
23
24
25
26
### 原理部分 ###
# 检查git仓库状态
PS ~\aliceWorkspace> git status
On branch master
No commits yet
Changes to be committed:
(use "git rm --cached <file>..." to unstage)
new file: README.md
# 检查git对象,发现多了一个blob类型记录了新的README.md文件内容
PS ~\aliceWorkspace> tree .\.git\objects\
├─01/ccc646d113420d128301639686e16799ece787 # blob,内容是首次add的README.md
├─74/70c63fd32dc148b1c9cf317c5fbd2a9616b492
├─info
└─pack
PS ~\aliceWorkspace> git cat-file -p 7470
ÿþrepo inited --wilson
# 再次执行git gc进行垃圾回收打包,发现git对象中刚刚的新blob类型消失了
PS ~\aliceWorkspace> git gc
Enumerating objects: 1, done.
Counting objects: 100% (1/1), done.
Writing objects: 100% (1/1), done.
Total 1 (delta 0), reused 0 (delta 0), pack-reused 0
PS ~\aliceWorkspace> tree .\.git\objects\
├─01/ccc646d113420d128301639686e16799ece787
├─info
└─pack

使用commit进行提交

1
2
3
4
5
6
### 指令部分 ###
# 进行提交,即生成了一个项目的快照
PS ~\aliceWorkspace> git commit -m "first commit : init README.md"
[master (root-commit) becd906] first commit : init README.md
1 file changed, 0 insertions(+), 0 deletions(-)
create mode 100644 README.md
1
2
3
4
5
6
7
8
9
10
11
12
13
14
15
16
17
18
19
20
21
22
23
24
25
26
27
28
29
### 原理部分 ###
PS ~\aliceWorkspace> git status
On branch master
nothing to commit, working tree clean
# 检查git对象
PS ~\aliceWorkspace> tree .\.git\objects\
├─01/ccc646d113420d128301639686e16799ece787 # blob,内容是首次add的README.md
├─9d/7e540963b86926d49c605df45e40ee64c3aca5
├─be/cd90604bc3786383cc3dec2b58befc221743ef
├─info
└─pack
# tree类型相当于一个路径,他会指向该路径下的所有文件对应的blob对象以及子目录对应的tree对象
# 这里这个tree相当于整个项目快照的根路径,它指向之前修改后的README.md文件对应的7470的blob对象
PS ~\aliceWorkspace> git cat-file -t 9d7e
tree
PS ~\aliceWorkspace> git cat-file -p 9d7e
100644 blob 7470c63fd32dc148b1c9cf317c5fbd2a9616b492 README.md
# 每个commit类型其实就是一个项目的快照
# 其中commit类型对象一定指向一个tree类型,这个tree相当于当前快照的目录结构树的根节点,可以理解为项目的根路径对应的tree类型,通过这个tree类型遍历得到快照内所有的文件对应的blob对象
# 其中author和committer记录的提交这次commit操作的用户和时间
# 其中“first commit : init README.md”是操作commit时-m内包含的提交注释信息,是每次commit操作必须携带的
PS ~\aliceWorkspace> git cat-file -t becd
commit
PS ~\aliceWorkspace> git cat-file -p becd
tree 9d7e540963b86926d49c605df45e40ee64c3aca5
author WilsonGoGo <[email protected]> 1663302147 +0800
committer WilsonGoGo <[email protected]> 1663302147 +0800
first commit : init README.md

示例三:分支管理

一般情况下,开发一个项目时,我们需要保证主分支上的版本都是可用的,然后基于可用的主分支去新建一个dev分支用于测试开发版本

1
2
3
4
5
6
7
8
9
10
11
12
13
# 新建dev分支
PS ~\aliceWorkspace> git branch dev
# 检查所有分支,当前指针仍然处于master分支上
PS ~\aliceWorkspace> git branch
dev
* master
# 切换分支
PS ~\aliceWorkspace> git switch dev
Switched to branch 'dev'
# 检查分支,已经切换成功
PS ~\aliceWorkspace> git branch
* dev
master

进行开发,这里模拟创建task.doc文件记录开发要求(即记录各开发员信息)

1
2
PS ~\aliceWorkspace> new-item task.doc
PS ~\aliceWorkspace> echo "record everyone's name" > .\task.doc

开发结束,进行commit来更新dev分支指向的快照

1
2
3
4
5
6
7
8
### 代码部分 ###
# 提交所有改动至暂存区
PS ~\aliceWorkspace> git add .
# 提交commit保存快照至dev分支
PS ~\aliceWorkspace> git commit -m "dev: init task.doc"
[dev f712190] dev: init task.doc
1 file changed, 0 insertions(+), 0 deletions(-)
create mode 100644 task.doc

通过可视化界面(来自VsCode的gitLens插件),检查分支图:

1663306845322

1
2
3
4
5
6
7
8
9
10
11
12
13
14
15
16
17
18
19
20
21
22
23
24
25
26
27
28
29
30
31
32
33
34
35
36
37
38
39
40
41
42
43
44
45
46
47
48
49
50
51
52
53
54
55
56
57
58
59
60
### 原理部分 ###
## 检查git对象 ##
PS ~\aliceWorkspace> tree .\.git\objects\
├─01/ccc646d113420d128301639686e16799ece787 # blob,内容是首次add的README.md
├─78/c2277b22f2c1e22a4d29fbe4cc443dd6f267ad
├─8a/ca54ef6e8b187c21516723fe4e2c16f4104e1b
├─9d/7e540963b86926d49c605df45e40ee64c3aca5 # tree, 首次commit的快照根节点
├─be/cd90604bc3786383cc3dec2b58befc221743ef # commit, master分支的首次commit
├─f7/12190f68a943af3cdf3a911327a51d188f7d9a
├─info
└─pack
# 78c2... blob类型 储存新建的task.doc文件
PS ~\aliceWorkspace> git cat-file -t 78c2
blob
PS ~\aliceWorkspace> git cat-file -p 78c2
ÿþrecord everyone's name
# 8aca... tree类型 是包含task.doc的快照根目录
PS ~\aliceWorkspace> git cat-file -t 8aca
tree
PS ~\aliceWorkspace> git cat-file -p 8aca
100644 blob 7470c63fd32dc148b1c9cf317c5fbd2a9616b492 README.md
100644 blob 78c2277b22f2c1e22a4d29fbe4cc443dd6f267ad task.doc
# f712... commit类型 对应dev分支上刚刚的commit操作 指向8aca...tree类型
PS ~\aliceWorkspace> git cat-file -t f712
commit
PS ~\aliceWorkspace> git cat-file -p f712
tree 8aca54ef6e8b187c21516723fe4e2c16f4104e1b
parent becd90604bc3786383cc3dec2b58befc221743ef
author WilsonGoGo <[email protected]> 1663304672 +0800
committer WilsonGoGo <[email protected]> 1663304672 +0800
dev: init task.doc

## 检查指针 ##

# 检查HEAD指针 #
# HEAD指针当前值:HEAD指针目前指向dev分支,与dev分支指针同步
PS ~\aliceWorkspace> cat .\.git\HEAD
ref: refs/heads/dev
# HEAD指针历史记录
PS ~\aliceWorkspace> cat .\.git\logs\HEAD
0000000000000000000000000000000000000000 becd90604bc3786383cc3dec2b58befc221743ef WilsonGoGo <[email protected]> 1663302147 +0800 commit (initial): first commit : init README.md # 这条记录表示HEAD指针从git初始化时的00...变动至第一次commit(提交了README.md)的becd...快照
becd90604bc3786383cc3dec2b58befc221743ef becd90604bc3786383cc3dec2b58befc221743ef WilsonGoGo <[email protected]> 1663303934 +0800 checkout: moving from master to dev # 这条记录表示HEAD指针从master分支移动到dev分支,但是这两个分支目前指向的同一个commit对象becd...,即指向同一个项目快照
becd90604bc3786383cc3dec2b58befc221743ef f712190f68a943af3cdf3a911327a51d188f7d9a WilsonGoGo <[email protected]> 1663304672 +0800 commit: dev: init task.doc # 这条记录表示HEAD指针从第一次commit的快照becd...指向了第二次commit(提交了task.doc)的快照f714...

# 检查各分支指针 #
# master分支
# master指针值仍指向刚提交完README.md时提交的commit类型
PS ~\aliceWorkspace> cat .\.git\refs\heads\master
becd90604bc3786383cc3dec2b58befc221743ef
# master指针历史记录
PS ~\aliceWorkspace> cat .\.git\logs\refs\heads\master
0000000000000000000000000000000000000000 becd90604bc3786383cc3dec2b58befc221743ef WilsonGoGo <[email protected]> 1663302147 +0800 commit (initial): first commit : init README.md # 该条表示master指针从初始化0000...指向了becd...(首次commit,即README.md的提交)
# dev分支
# dev指针值已经指向刚刚提交了task.doc后的commit类型
PS ~\aliceWorkspace> cat .\.git\refs\heads\dev
f712190f68a943af3cdf3a911327a51d188f7d9a
# dev指针历史记录
PS ~\aliceWorkspace> cat .\.git\logs\refs\heads\dev
0000000000000000000000000000000000000000 becd90604bc3786383cc3dec2b58befc221743ef WilsonGoGo <[email protected]> 1663303857 +0800 branch: Created from master # 这条记录表示dev分支从master分支上创建而来
becd90604bc3786383cc3dec2b58befc221743ef f712190f68a943af3cdf3a911327a51d188f7d9a WilsonGoGo <[email protected]> 1663304672 +0800 commit: dev: init task.doc # 这条记录表示dev指针从becd...(首次commit,即README.md的提交)指向了f712...(第二次commit,即task.doc的提交)

由于此时,master分支与main分支指向的快照上有所不同,尝试切换分支观察工作区对应文件的变化

1
2
3
4
5
6
7
8
9
10
11
12
13
14
15
16
# master分支
PS ~\aliceWorkspace> git switch master
Switched to branch 'main'
PS ~\aliceWorkspace> ls
Mode LastWriteTime Length Name
---- ------------- ------ ----
-a---- 2022/9/16 12:13 46 README.md

# dev分支
PS ~\aliceWorkspace> git switch dev
Switched to branch 'dev'
PS ~\aliceWorkspace> ls
Mode LastWriteTime Length Name
---- ------------- ------ ----
-a---- 2022/9/16 12:13 46 README.md
-a---- 2022/9/16 14:43 50 task.doc

可以看出,当分支切换时,工作区对应的文件也会被更改至快照状态

示例三:简单提交

完成前两个示例后,alice希望将仓库同步到远程仓库,这样其他开发员就可以一起对项目进行开发

1
2
3
4
5
6
7
8
9
10
11
12
13
14
15
16
17
18
19
20
21
22
23
24
25
26
27
28
29
30
31
32
# 切换回master主分支,并将其同步至远程
PS ~\aliceWorkspace> git switch master
# github上默认的主分支名称叫mian,我们先把本地master分支推送至远程仓库的main分支上
PS ~\aliceWorkspace> git push origin master:main # 这里的origin值代表目标远程仓库名,这个值在示例一中已经配置过了
Enumerating objects: 3, done.
Counting objects: 100% (3/3), done.
Writing objects: 100% (3/3), 275 bytes | 275.00 KiB/s, done.
Total 3 (delta 0), reused 1 (delta 0), pack-reused 0
To github.com:WilsonGoGo/gitLearning.git
* [new branch] master -> main
# 还需要将dev分支也一并推送
PS ~\aliceWorkspace> git push --all origin # 这里偷懒使用--all将本地所有分支上传
Enumerating objects: 4, done.
Counting objects: 100% (4/4), done.
Delta compression using up to 8 threads
Compressing objects: 100% (3/3), done.
Writing objects: 100% (3/3), 333 bytes | 333.00 KiB/s, done.
Total 3 (delta 0), reused 0 (delta 0), pack-reused 0
To github.com:WilsonGoGo/gitLearning.git
* [new branch] dev -> dev
* [new branch] master -> master # 这次的--all指令导致master分支被再次推送至远程仓库,并新建同名分支master来储存
# 注:
# 由于github的默认主分支是main,我们第一次push时已经上传过了,而上一次push --all导致远程仓库的master和main分支重复。为了以后操作方便,将本地的master重命名为main,并将github上重复的master分支删除
# 重命名分支
PS ~\aliceWorkspace> git branch -m master main
PS ~\aliceWorkspace> git branch
dev
* main
# 删除远程仓库的master分支
PS ~\aliceWorkspace> git push origin :master
To github.com:WilsonGoGo/gitLearning.git
- [deleted] master

注:这里出现一个问题,就是本地git init的默认分支是master,github建立仓库的默认分支现在已经改为main,在上述操作中因为默认分支名不同,导致了github上有master和main的两个重复分支,以下给出几种方案来避免这个问题:

  1. 在本地初始化仓库时,使用git config --global init.defaultBranch main将本地git仓库默认分支命名为main
  2. 在github创建仓库页面,通过setting选项修改仓库默认分支为master

示例四:拉取仓库

现在程序员bob加入项目的开发,他需要把仓库clone至本地来加入开发

1
2
3
4
5
6
7
8
9
10
11
12
13
14
15
16
17
18
19
20
21
# 拉取仓库
PS ~\bobWorkspace> git clone [email protected]:WilsonGoGo/gitLearning.git
Cloning into 'gitLearning'...
remote: Enumerating objects: 6, done.
remote: Counting objects: 100% (6/6), done.
remote: Compressing objects: 100% (4/4), done.
remote: Total 6 (delta 0), reused 6 (delta 0), pack-reused 0
Receiving objects: 100% (6/6), done.
# 检查发现只有main分支
PS ~\bobWorkspace\gitLearning> git branch
* main
# 原因是默认隐藏远程分支,用-a查看所有分支
PS ~\bobWorkspace\gitLearning> git branch -a
* main
remotes/origin/HEAD -> origin/main
remotes/origin/dev
remotes/origin/main
# 切换至远程分支dev上
PS ~\bobWorkspace\gitLearning> git checkout -t origin/dev
Switched to a new branch 'dev'
branch 'dev' set up to track 'origin/dev'.

现在bob程序员可以在本地对dev进行开发了

示例五:差异比较

切回alice视角,继续对dev分支进行开发

1
2
3
4
5
6
7
8
9
10
11
12
13
14
15
16
17
18
19
20
21
22
23
24
25
# 先创建几个文件
PS ~\aliceWorkspace> new-item nameList.txt
PS ~\aliceWorkspace> mkdir aliceInfo
PS ~\aliceWorkspace> cd .\aliceInfo\
PS ~\aliceWorkspace\aliceInfo> new-item workList.txt
# 将nameList.txt加入暂存区后,尝试切换分支并检查git仓库状态,发现没有区别
# 说明暂存区的文件是不记录对应分支的,只有commit操作时,生成commit快照的同时再移动各branch的指针与HEAD的指针
PS ~\aliceWorkspace> git add nameList.txt
PS ~\aliceWorkspace> git branch alice
PS ~\aliceWorkspace> git switch alice
PS ~\aliceWorkspace> git status
Changes to be committed:
(use "git restore --staged <file>..." to unstage)
new file: nameList.txt
Untracked files:
(use "git add <file>..." to include in what will be committed)
aliceInfo/
PS ~\aliceWorkspace> git switch dev
PS ~\aliceWorkspace> git status
Changes to be committed:
(use "git restore --staged <file>..." to unstage)
new file: nameList.txt
Untracked files:
(use "git add <file>..." to include in what will be committed)
aliceInfo/

继续开发

1
2
# 向nameList中写入内容
PS ~\aliceWorkspace> echo "alice" > nameList.txt
1
2
3
4
5
6
7
8
9
10
11
12
13
14
15
16
17
18
19
20
21
22
23
### git diff 原理 ###
# 执行git diff指令
# 注:
# git diff查看的相当于是工作区修改过的文件和缓存区中的文件进行比较
# 因为nameList.txt之前已经git add过一次了,执行git diff指令,git会将工作区目前的nameList进行哈希算法和缓存去的哈希值比较,然后发现存在差异
# 而其他还未加入暂存区的文件,则不会进行diff比较,因此也就未提示
PS ~\aliceWorkspace> git diff
diff --git a/nameList.txt b/nameList.txt
index e69de29..12381d8 100644
Binary files a/nameList.txt and b/nameList.txt differ
# 更新nameList.txt文件至暂存区
PS ~\aliceWorkspace> git add nameList.txt
#
PS ~\aliceWorkspace> git diff # 此时工作区的文件与暂存区的文件是没有差异的
PS ~\aliceWorkspace> git diff HEAD # 比较HEAD指针指向的快照与当前工作区文件差异
diff --git a/nameList.txt b/nameList.txt
new file mode 100644
index 0000000..12381d8
Binary files /dev/null and b/nameList.txt differ # 说明HEAD指针指向的镜像中没有nameList.txt文件,与当前工作区中不同
# 注:
# 当前HEAD指向ref: refs/heads/alice
# 而此时,由于工作区的nameList.txt经历过git add操作,git仓库区有其对应的blob对象(即被标记为追踪的状态),所以才可以通过git diff比对
# 而其他./aliceInfo/workList.txt未经历过git add操作,git仓库区无对应的blob对象(即被标记为未追踪的状态),所以git diff不会将其进行对比

提交对nameList.txt的更改

1
2
3
4
5
6
7
8
9
10
11
12
13
14
15
16
17
18
19
20
21
# 提交commit至本地
PS ~\aliceWorkspace> git commit -m "init: nameList.txt"
[alice 6dffd65] init: nameList.txt
1 file changed, 0 insertions(+), 0 deletions(-)
create mode 100644 nameList.txt
# 推送至远程仓库
PS ~\aliceWorkspace> git push origin
--all
Enumerating objects: 8, done.
Counting objects: 100% (8/8), done.
Delta compression using up to 8 threads
Compressing objects: 100% (5/5), done.
Writing objects: 100% (7/7), 691 bytes | 691.00 KiB/s, done.
Total 7 (delta 1), reused 0 (delta 0), pack-reused 0
remote: Resolving deltas: 100% (1/1), done.
remote:
remote: Create a pull request for 'alice' on GitHub by visiting:
remote: https://github.com/WilsonGoGo/gitLearning/pull/new/alice
remote:
To github.com:WilsonGoGo/gitLearning.git
* [new branch] alice -> alice

参考: Git 原理入门 - 阮一峰的网络日志 (ruanyifeng.com)

示例六:版本控制

继续在alice分支中开发

1
2
3
4
5
6
7
8
9
# 向./aliceInfo/workList.txt中写入内容
PS ~\aliceWorkspace> echo "init repo" > .\aliceInfo\workList.txt
PS ~\aliceWorkspace> " status:complete" >> .\aliceInfo\workList.txt
# 添加并提交commit
PS ~\aliceWorkspace> git add .
PS ~\aliceWorkspace> git commit -m "first edit to aliceInfo/workList.txt"
[alice a8dd21a] first edit to aliceInfo/workList.txt
1 file changed, 0 insertions(+), 0 deletions(-)
create mode 100644 aliceInfo/workList.txt

1.撤销 工作区文件 的改动

如果某文件之前通过git add提交至暂存区,可以用restore命令将其恢复至暂存区中的状态

1
2
3
4
5
6
7
8
9
10
11
12
# 检查文件原本状态
PS ~\aliceWorkspace> cat .\task.doc
record everyone's name
# 修改目标文件
PS ~\aliceWorkspace> "duhgfaoshdohods" >> .\task.doc
PS ~\aliceWorkspace> cat .\task.doc
record everyone's name
duhgfaoshdohods
# 撤销改动
PS ~\aliceWorkspace> git restore .\task.doc
PS ~\aliceWorkspace> cat .\task.doc
record everyone's name

2.撤销 git add 的提交

这次alice在目录中错误创建了error.txt文件并通过git add添加至了暂存区

1
2
3
4
5
6
7
8
9
10
11
12
13
14
15
16
17
18
19
20
21
22
23
24
25
26
27
28
29
30
31
32
33
34
35
36
37
38
39
PS ~\aliceWorkspace> new-item error.txt
PS ~\aliceWorkspace> git add .
PS ~\aliceWorkspace> git status
On branch alice
Changes to be committed:
(use "git restore --staged <file>..." to unstage)
new file: error.txt

# 方法一:撤销error.txt对暂存区的git add提交
PS ~\aliceWorkspace> git restore --staged .\error.txt
PS ~\aliceWorkspace> git status
On branch alice
Untracked files:
(use "git add <file>..." to include in what will be committed)
error.txt
nothing added to commit but untracked files present (use "git add" to track)
# 方法二:保留工作区的error.txt文件,但删除其在暂存区中的缓存
# 使用
PS ~\aliceWorkspace> git rm --cached .\error.txt
rm 'error.txt'
PS ~\aliceWorkspace> git status
On branch alice
Untracked files:
(use "git add <file>..." to include in what will be committed)
error.txt
nothing added to commit but untracked files present (use "git add" to track)
# 方法三:同时删除工作区的error.txt文件和其在暂存区中的缓存
PS ~\aliceWorkspace> git rm -f .\error.txt
rm 'error.txt'
PS ~\aliceWorkspace> git status
On branch alice
nothing to commit, working tree clean
PS ~\aliceWorkspace> ls
Mode LastWriteTime Length Name
---- ------------- ------ ----
d----- 2022/9/16 16:39 aliceInfo
-a---- 2022/9/16 15:29 16 nameList.txt
-a---- 2022/9/16 12:13 46 README.md
-a---- 2022/9/16 14:46 50 task.doc

3.撤销 git commit 提交

假设这里alice进行误操作,将workList.txt删除了并完成了commit

1
2
3
4
5
6
7
# 删除文件并提交commit
PS ~\aliceWorkspace> rm .\aliceInfo\workList.txt
PS ~\aliceWorkspace> git add . # 对删除文件的改动也需要先提交至暂存区
PS ~\aliceWorkspace> git commit -m "del workList.txt by mistake"
[alice 9a26de2] del workList.txt by mistake
1 file changed, 0 insertions(+), 0 deletions(-)
delete mode 100644 aliceInfo/workList.txt

为了撤销这次删除操作,使用reset回滚到上一次commit对应的快照。根据下图可视化结果可以看到,我们希望回退到a8dd…对应的commit快照

1663317290536

1
2
3
4
5
6
7
8
9
10
11
12
13
14
15
16
17
18
19
20
21
22
23
# 如果没有可视化工具,可以使用 git log 查看提交历史
PS ~\aliceWorkspace> git log
commit 9a26de27db3a264c53bc50934a32817edfc8d3d3 (HEAD -> alice)
Author: WilsonGoGo <[email protected]>
Date: Fri Sep 16 16:18:10 2022 +0800
del workList.txt by mistake

commit a8dd21a0a01907bb801ccfc874d1fdf2c36fe57c
Author: WilsonGoGo <[email protected]>
Date: Fri Sep 16 16:07:49 2022 +0800
first edit to aliceInfo/workList.txt
...
# 回滚到a8dd...的commit快照
PS ~\aliceWorkspace> git reset a8dd
Unstaged changes after reset:
D aliceInfo/workList.txt
# 再次检查log记录
PS ~\aliceWorkspace> git log
commit a8dd21a0a01907bb801ccfc874d1fdf2c36fe57c (HEAD -> alice)
Author: WilsonGoGo <[email protected]>
Date: Fri Sep 16 16:07:49 2022 +0800
first edit to aliceInfo/workList.txt
...

回滚后的可视化结果

1663317515159

但是检查发现,文件并没有回到工作区,需要继续用git restore将工作区文件从快照切换回来

1
2
3
4
5
6
7
8
9
10
11
12
13
14
# 先通过git status查看
PS ~\aliceWorkspace> git status
On branch alice
Changes not staged for commit:
(use "git add/rm <file>..." to update what will be committed)
(use "git restore <file>..." to discard changes in working directory)
deleted: aliceInfo/workList.txt
no changes added to commit (use "git add" and/or "git commit -a")
# 使用restore命令恢复工作区文件
PS ~\aliceWorkspace> git restore .\aliceInfo\workList.txt
# 注:
# restore命令是从暂存区撤销改动
# 而我们之前虽然使用git reset回滚了commit快照,但是这并没有影响到工作区已经删除了workList.txt的现状
# 因此需要用restore从commit快照中恢复工作区缺少的文件

示例七:合并分支

1.简单合并分支

alice现在希望将之前的修改合并至dev分支上

1
2
3
4
5
6
7
8
9
10
11
12
# 切换至dev分支
PS ~\aliceWorkspace> git switch dev
Switched to branch 'dev'
# 将alice分支合并至主分支上
PS ~\aliceWorkspace> git merge alice
Updating f712190..a8dd21a
Fast-forward
aliceInfo/workList.txt | Bin 0 -> 60 bytes
nameList.txt | Bin 0 -> 16 bytes
2 files changed, 0 insertions(+), 0 deletions(-)
create mode 100644 aliceInfo/workList.txt
create mode 100644 nameList.txt

合并后的可视化图

1663327478070

因为创建alice分支后,dev分支自身并无变化,因此如上图所示,本次合并其实就是将dev分支的指针移动到alice分支的指针上即可

2.复杂合并分支

如果dev分支和alice分支分别做出了不同的改动,也可以直接进行merge合并

1
2
3
4
5
6
7
8
9
10
11
12
13
14
15
16
17
18
19
# dev分支进行改动
PS ~\aliceWorkspace> "bob" >> nameList.txt # 工作区的改动、暂存区的内容 与 当前分支无关
PS ~\aliceWorkspace> git switch dev # commit操作与当前分支相关,commit后会更新当前分支的指针
Switched to branch 'dev'
M nameList.txt # 这里是在切换分支时提示,此时还有没有add至暂存区的改动
Your branch is up to date with 'origin/dev'.
PS ~\aliceWorkspace> git add .
PS ~\aliceWorkspace> git commit -m "update nameList.txt : add bob"
[dev 03c3682] update nameList.txt : add bob
1 file changed, 0 insertions(+), 0 deletions(-)
# alice分支进行改动
PS ~\aliceWorkspace> git switch alice
Switched to branch 'alice'
PS ~\aliceWorkspace> "demo 1~6" >> .\aliceInfo\workList.txt
PS ~\aliceWorkspace> " complete" >> .\aliceInfo\workList.txt
PS ~\aliceWorkspace> git add .
PS ~\aliceWorkspace> git commit -m "update alice workList.txt : record demo 1~6"
[alice c3aa43b] update alice workList.txt : record demo 1~6
1 file changed, 0 insertions(+), 0 deletions(-)

检查可视化视图,发现因为alice与dev上分别做出了改动,因此它们的指针开始有了分歧

1663329511022

但是由于在这两个分支上修改的内容并不冲突,因此仍然可以直接进行merge

1
2
3
4
5
6
7
# 现在希望将dev分支上的改动同步到alice分支上
PS ~\aliceWorkspace> git switch alice
Switched to branch 'alice'
PS ~\aliceWorkspace> git merge dev
Merge made by the 'ort' strategy.
nameList.txt | Bin 16 -> 26 bytes
1 file changed, 0 insertions(+), 0 deletions(-)

由于同步了dev分支,因此现在可以在alice分支上继续开发,并提交commit

1
2
3
4
5
6
PS ~\aliceWorkspace> "demo 7" >> .\aliceInfo\workList.txt
PS ~\aliceWorkspace> " working..." >> .\aliceInfo\workList.txt
PS ~\aliceWorkspace> git add .
PS ~\aliceWorkspace> git commit -m "update alice workList : demo 7 added"
[alice 3ebcf1e] update alice workList : demo 7 added
1 file changed, 0 insertions(+), 0 deletions(-)

现在我们完成了本轮alice分支的开发,将其保存至dev分支上去

1
2
3
4
5
6
7
8
9
PS ~\aliceWorkspace> git switch dev
Switched to branch 'dev'
Your branch is ahead of 'origin/dev' by 1 commit.
(use "git push" to publish your local commits)
PS ~\aliceWorkspace> git merge alice
Updating 03c3682..3ebcf1e
Fast-forward
aliceInfo/workList.txt | Bin 60 -> 144 bytes
1 file changed, 0 insertions(+), 0 deletions(-)

检查可视化结果,可以看到两分支最终再次交汇

1663330031701

3.合并冲突分支

先在dev分支和alice分支上都做出更改,但是这次对task.doc更改的内容是冲突的

1
2
3
4
5
6
7
8
9
10
11
12
13
14
15
# dev上更改
PS ~\aliceWorkspace> "working on dev is fine" >> .\task.doc
PS ~\aliceWorkspace> git add .
PS ~\aliceWorkspace> git commit -m "working on dev is fine"
[dev f8a5a91] working on dev is fine
1 file changed, 0 insertions(+), 0 deletions(-)
# alice上更改
PS ~\aliceWorkspace> git switch alice
Switched to branch 'alice'
PS ~\aliceWorkspace> "do not directly work on dev" >> .\task.doc
PS ~\aliceWorkspace> " complete" >> .\aliceInfo\workList.txt
PS ~\aliceWorkspace> git add .
PS ~\aliceWorkspace> git commit -m "don't directly work on dev"
[alice 83c0743] don't directly working on dev
2 files changed, 0 insertions(+), 0 deletions(-)

1663330487688

尝试合并会报错

1
2
3
4
5
PS ~\aliceWorkspace> git merge dev
warning: Cannot merge binary files: task.doc (HEAD vs. dev)
Auto-merging task.doc
CONFLICT (content): Merge conflict in task.doc
Automatic merge failed; fix conflicts and then commit the result.

根据提示发现task.doc文件产生了冲突,这里可以通过切换分支观察该文件内的差异,手动修复冲突。这里使用了VsCode插件中的合并编辑器功能

1663331167872

修复成功后,通过以下指令决定下一步

1
2
3
4
5
6
7
# 确认解决冲突,提交新commit作为合并后的快照
PS ~\aliceWorkspace> git commit -m "merge : fix conflict in task.doc"
[alice 6259c91] merge : fix conflict in task.doc
# 中止合并
git merge --abort
# 撤销合并
git reset --merge

这里选择提交新commit来完成合并,可视化结果如下

1663331533951

最后记得将所有改动推送至远程仓库

1
2
3
4
5
6
7
8
9
10
11
PS ~\aliceWorkspace> git push origin --all
Enumerating objects: 27, done.
Counting objects: 100% (27/27), done.
Delta compression using up to 8 threads
Compressing objects: 100% (18/18), done.
Writing objects: 100% (22/22), 1.95 KiB | 665.00 KiB/s, done.
Total 22 (delta 11), reused 0 (delta 0), pack-reused 0
remote: Resolving deltas: 100% (11/11), done.
To github.com:WilsonGoGo/gitLearning.git
a8dd21a..6259c91 alice -> alice
a8dd21a..f8a5a91 dev -> dev

参考: Git 原理入门 - 阮一峰的网络日志 (ruanyifeng.com)

示例八:同步远程仓库

现在回到bob视角,由于之前alice对项目做过许多更改,现在需要更新本地仓库内容

1
2
3
4
5
6
7
8
9
10
11
12
13
14
15
16
17
18
19
20
21
22
23
24
25
26
27
28
29
30
31
# 同步远程仓库的内容至本地
PS ~\bobWorkspace\gitLearning> git fetch origin
remote: Enumerating objects: 27, done.
remote: Counting objects: 100% (27/27), done.
remote: Compressing objects: 100% (7/7), done.
remote: Total 22 (delta 11), reused 22 (delta 11), pack-reused 0
Unpacking objects: 100% (22/22), 1.93 KiB | 2.00 KiB/s, done.
From github.com:WilsonGoGo/gitLearning
f712190..f8a5a91 dev -> origin/dev
a8dd21a..6259c91 alice -> origin/alice
# 注:
# 这一步只是获取远程仓库里远程分支的信息,不会对本地内容进行修改
# 即,至更新git branch -r的远程分支内容

# 将远程仓库的dev分支同步给本地的dev分支
PS ~\bobWorkspace\gitLearning> git pull origin dev
From github.com:WilsonGoGo/gitLearning
* branch dev -> FETCH_HEAD
Updating f712190..f8a5a91
Fast-forward
aliceInfo/workList.txt | Bin 0 -> 144 bytes
nameList.txt | Bin 0 -> 26 bytes
task.doc | Bin 50 -> 98 bytes
3 files changed, 0 insertions(+), 0 deletions(-)
create mode 100644 aliceInfo/workList.txt
create mode 100644 nameList.txt
# 注:
# git pull <repoName> <repo branch>:<local branch> 命令
# 实际上就是先fetch远程仓库中<repoName>/<repo branch>分支信息
# 再执行git merge <repoName>/<repo branch> <local branch> 将远程分支与本地分支合并
# 如果merge过程中有冲突,则同样需要解决冲突

现在已经保证了本地dev分支与远程仓库的dev分支相同,bob开始第一次开发,并提交commit

1
2
3
4
5
6
7
8
9
# 创建相应文件与目录
PS ~\bobWorkspace\gitLearning> mkdir bobInfo
PS ~\bobWorkspace\gitLearning> new-item bobInfo/workList.txt
# 提交commit
PS ~\bobWorkspace\gitLearning> git add .
PS ~\bobWorkspace\gitLearning> git commit -m "init bobInfo"
[dev 93ae1a5] init bobInfo
1 file changed, 0 insertions(+), 0 deletions(-)
create mode 100644 bobInfo/workList.txt

但是bob此时错误的将这次commit提交至了dev分支。现在bob希望撤销本次在dev分支上的commit,转而基于dev分支创建bob分支从而提交本次开发的commit

1
2
3
4
5
6
7
# bob选择用revert命令撤销上一次commit的改动
PS ~\bobWorkspace\gitLearning> git revert 93ae1a
[dev 6a4218a] Revert "init bobInfo"
1 file changed, 0 insertions(+), 0 deletions(-)
delete mode 100644 bobInfo/workList.txt
# 注:
# convert指令是通过一次新的commit提交,用相反的操作抵消目标commit的所有操作

可视化结果如下,可以看出与reset不同,dev分支上多了一个revert操作对应的commit

1663332986501

示例九:冲突推送

1.push撤销

alice在nameList.txt内添加了carol的名字,并提交了commit,push至了远程仓库,alice需要撤销上一次push操作

1
2
3
4
5
6
7
8
9
10
11
12
13
14
15
16
17
18
PS ~\aliceWorkspace> "carol" >> .\nameList.txt
Everything up-to-date
PS ~\aliceWorkspace> git add .
PS ~\aliceWorkspace> git switch dev
Switched to branch 'dev'
M nameList.txt
Your branch is up to date with 'origin/dev'.
PS ~\aliceWorkspace> git commit -m "nameList : add carol"
[dev 782de60] nameList : add carol
1 file changed, 0 insertions(+), 0 deletions(-)
Enumerating objects: 5, done.
Counting objects: 100% (5/5), done.
Compressing objects: 100% (2/2), done.
Writing objects: 100% (3/3), 307 bytes | 307.00 KiB/s, done.
Total 3 (delta 1), reused 0 (delta 0), pack-reused 0
remote: Resolving deltas: 100% (1/1), completed with 1 local object.
To github.com:WilsonGoGo/gitLearning.git
f8a5a91..782de60 dev -> dev

方法一:用revert的方法,push一个撤销操作的commit至远程仓库

1
2
3
4
5
6
7
8
9
10
11
12
13
14
15
16
17
18
19
20
21
22
23
# 如果本地已经使用了reset撤销了这次commit
PS ~\aliceWorkspace> git reset HEAD^
# 则先将本地仓库同步至远程仓库状态
PS ~\aliceWorkspace> git merge origin/dev
Updating f8a5a91..782de60
Fast-forward
nameList.txt | Bin 26 -> 40 bytes
1 file changed, 0 insertions(+), 0 deletions(-)
# 提交revert操作
PS ~\aliceWorkspace> git revert 782de6
[dev bf6cf22] Revert "nameList : add carol"
1 file changed, 0 insertions(+), 0 deletions(-)
# 推送至远程仓库
PS ~\aliceWorkspace> git push origin --all
Enumerating objects: 5, done.
Counting objects: 100% (5/5), done.
Delta compression using up to 8 threads
Compressing objects: 100% (2/2), done.
Writing objects: 100% (3/3), 323 bytes | 323.00 KiB/s, done.
Total 3 (delta 1), reused 0 (delta 0), pack-reused 0
remote: Resolving deltas: 100% (1/1), completed with 1 local object.
To github.com:WilsonGoGo/gitLearning.git
782de60..bf6cf22 dev -> dev

方法二:如果本地已经使用了reset撤销了这次commit,考虑使用–force来push,实现覆盖远程仓库

1
PS ~\aliceWorkspace> git push --force origin --all

2.push冲突

现在模拟以下alice和bob同步开发导致的冲突,首先双方都需要先fetch仓库保证自己dev分支已经和远程仓库同步,然后双方各自在本地基于dev分支创建自己名称的分支,用于独立开发各自的内容

1
2
3
4
5
6
7
8
9
10
11
12
13
14
15
16
17
18
19
20
### alice ###
PS ~\aliceWorkspace> git fetch
remote: Enumerating objects: 7, done.
remote: Compressing objects: 100% (3/3), done.
remote: Total 6 (delta 1), reused 6 (delta 1), pack-reused 0
From github.com:WilsonGoGo/gitLearning
PS ~\aliceWorkspace> git merge origin/dev
Updating bf6cf22..f7c3213
Fast-forward
PS ~\aliceWorkspace> git switch alice
Switched to branch 'alice'
PS ~\aliceWorkspace> git merge dev # alice分支之前已经存在,这里将其与dev分支合并,保证其此时与dev同步
Merge made by the 'ort' strategy.
### bob ###
PS ~\bobWorkspace\gitLearning> git fetch
PS ~\bobWorkspace\gitLearning> git merge origin/dev
Already up to date.
PS ~\bobWorkspace\gitLearning> git branch bob # bob分支是新建的
PS ~\bobWorkspace\gitLearning> git switch bob
Switched to branch 'bob'

现在假设bob先一步开发完成,并将自己的内容合并至了dev分支

1
2
3
4
5
6
7
8
9
10
11
12
13
14
15
16
17
18
19
20
21
22
23
24
25
26
27
28
29
30
31
32
33
34
35
36
# 修改工作区文件
PS ~\bobWorkspace\gitLearning> mkdir bobInfo
PS ~\bobWorkspace\gitLearning> new-item .\bobInfo\workList.txt
PS ~\bobWorkspace\gitLearning> "demo 9" >> .\bobInfo\workList.txt
PS ~\bobWorkspace\gitLearning> " complete" >> .\bobInfo\workList.txt
PS ~\bobWorkspace\gitLearning> "bob finished" >> .\task.doc
# 提交至暂存区
PS ~\bobWorkspace\gitLearning> git add .
# 本地提交commit
PS ~\bobWorkspace\gitLearning> git commit -m "update : bob workList and task.doc"
[bob 1220d06] update : bob workList and task.doc
2 files changed, 0 insertions(+), 0 deletions(-)
create mode 100644 bobInfo/workList.txt
# 将bob分支的开发内容合并给dev分支
PS ~\bobWorkspace\gitLearning> git switch dev
Switched to branch 'dev'
Your branch is up to date with 'origin/dev'.
PS ~\bobWorkspace\gitLearning> git merge bob
Updating f7c3213..1220d06
Fast-forward
bobInfo/workList.txt | Bin 0 -> 40 bytes
task.doc | Bin 98 -> 126 bytes
2 files changed, 0 insertions(+), 0 deletions(-)
create mode 100644 bobInfo/workList.txt
# 推送至远程仓库
PS ~\bobWorkspace\gitLearning> git push origin --all
Enumerating objects: 7, done.
Counting objects: 100% (7/7), done.
Delta compression using up to 8 threads
Compressing objects: 100% (3/3), done.
Writing objects: 100% (5/5), 458 bytes | 458.00 KiB/s, done.
Total 5 (delta 2), reused 0 (delta 0), pack-reused 0
remote: Resolving deltas: 100% (2/2), completed with 2 local objects.
To github.com:WilsonGoGo/gitLearning.git
f7c3213..1220d06 dev -> dev
* [new branch] bob -> bob

这时候alice也同步进行开发

1
2
3
4
5
6
7
8
9
10
11
12
13
14
15
16
17
18
19
# 修改工作区文件
PS ~\aliceWorkspace> " complete" >> .\aliceInfo\workList.txt
PS ~\aliceWorkspace> "alice complete" >> .\task.doc
# 添加至暂存区
PS ~\aliceWorkspace> git add .
# 本地提交commit
PS ~\aliceWorkspace> git commit -m "update : alice workList and task.doc"
[alice 18524b6] update : alice workList and task.doc
2 files changed, 0 insertions(+), 0 deletions(-)
# 合并开发内容至dev分支
PS ~\aliceWorkspace> git switch dev
Switched to branch 'dev'
Your branch is up to date with 'origin/dev'.
PS ~\aliceWorkspace> git merge alice
Updating f7c3213..18524b6
Fast-forward
aliceInfo/workList.txt | Bin 144 -> 230 bytes
task.doc | Bin 98 -> 146 bytes
2 files changed, 0 insertions(+), 0 deletions(-)

但是由于alice和bob在开发时都修改了task.doc文件,因此在推送时会产生冲突,报错如下所示

1
2
3
4
5
6
7
8
9
10
11
12
13
14
15
16
17
PS ~\aliceWorkspace> git push origin --all
Enumerating objects: 26, done.
Counting objects: 100% (25/25), done.
Delta compression using up to 8 threads
Compressing objects: 100% (12/12), done.
Writing objects: 100% (16/16), 1.78 KiB | 909.00 KiB/s, done.
Total 16 (delta 5), reused 0 (delta 0), pack-reused 0
remote: Resolving deltas: 100% (5/5), completed with 3 local objects.
To github.com:WilsonGoGo/gitLearning.git
ad21717..18524b6 alice -> alice
! [rejected] dev -> dev (fetch first)
error: failed to push some refs to 'github.com:WilsonGoGo/gitLearning.git'
hint: Updates were rejected because the remote contains work that you do
hint: not have locally. This is usually caused by another repository pushing
hint: to the same ref. You may want to first integrate the remote changes
hint: (e.g., 'git pull ...') before pushing again.
hint: See the 'Note about fast-forwards' in 'git push --help' for details.

为了解决冲突,先将远程仓库同步至本地,检查可视化视图(蓝色是远程仓库分支)

1663335659115

1
2
3
4
5
6
7
8
9
10
11
12
13
14
15
16
17
# 同步远程分支
PS ~\aliceWorkspace> git fetch
remote: Enumerating objects: 7, done.
remote: Counting objects: 100% (7/7), done.
remote: Compressing objects: 100% (1/1), done.
remote: Total 5 (delta 2), reused 5 (delta 2), pack-reused 0
Unpacking objects: 100% (5/5), 438 bytes | 4.00 KiB/s, done.
From github.com:WilsonGoGo/gitLearning
f7c3213..1220d06 dev -> origin/dev
* [new branch] bob -> origin/bob

# 将远程的dev分支合并到本地dev分支
PS ~\aliceWorkspace> git merge origin/dev
warning: Cannot merge binary files: task.doc (HEAD vs. origin/dev)
Auto-merging task.doc
CONFLICT (content): Merge conflict in task.doc
Automatic merge failed; fix conflicts and then commit the result.

借助VsCode的冲突编辑文本,修改冲突文件

1663335808744

1
2
3
4
5
6
7
8
9
10
11
12
13
14
# 修改完冲突后,新建commit作为合并结果
PS ~\aliceWorkspace> git commit -m "merge : fix conflict about task.doc between alice and bob"
[dev b650c32] merge : fix conflict about task.doc between alice and bob
# 推送至远程仓库
PS ~\aliceWorkspace> git push origin --all
Enumerating objects: 7, done.
Counting objects: 100% (7/7), done.
Delta compression using up to 8 threads
Compressing objects: 100% (3/3), done.
Writing objects: 100% (3/3), 399 bytes | 399.00 KiB/s, done.
Total 3 (delta 2), reused 0 (delta 0), pack-reused 0
remote: Resolving deltas: 100% (2/2), completed with 2 local objects.
To github.com:WilsonGoGo/gitLearning.git
1220d06..b650c32 dev -> dev

alice推送完成后,bob也需要再次同步

1
2
3
4
5
6
7
8
9
10
11
12
13
14
PS ~\bobWorkspace\gitLearning> git pull origin dev
remote: Enumerating objects: 21, done.
remote: Counting objects: 100% (19/19), done.
remote: Compressing objects: 100% (3/3), done.
remote: Total 9 (delta 5), reused 9 (delta 5), pack-reused 0
Unpacking objects: 100% (9/9), 994 bytes | 4.00 KiB/s, done.
From github.com:WilsonGoGo/gitLearning
* branch dev -> FETCH_HEAD
1220d06..b650c32 dev -> origin/dev
Updating 1220d06..b650c32
Fast-forward
aliceInfo/workList.txt | Bin 144 -> 230 bytes
task.doc | Bin 126 -> 174 bytes
2 files changed, 0 insertions(+), 0 deletions(-)

检查最终可视化结果

1663335948131

示例十:rebase的使用

如果Alice在开发中途发现自己基于的dev版本过时,可以更新自己本地的dev分支后,用rebase命令将自己的alice分支上的修改应用于新的dev分支

1
2
3
4
5
6
7
8
9
10
11
12
13
14
15
16
17
# 在示例十的结尾,alice和bob此时都已经将自己的仓库与远程仓库完成了同步
# 现在bob对dev进行了更改,并推送至远程仓库
PS ~\bobWorkspace\gitLearning> "need demo for rebase" >> .\task.doc # 工作区改动
PS ~\bobWorkspace\gitLearning> git add .
PS ~\bobWorkspace\gitLearning> git commit -m "add new need to task.doc" # 提交commit
[dev dd187f9] add new need to task.doc
1 file changed, 0 insertions(+), 0 deletions(-)
PS ~\bobWorkspace\gitLearning> git push origin --all # 推送至远程仓库
Enumerating objects: 5, done.
Counting objects: 100% (5/5), done.
Delta compression using up to 8 threads
Compressing objects: 100% (3/3), done.
Writing objects: 100% (3/3), 326 bytes | 326.00 KiB/s, done.
Total 3 (delta 2), reused 0 (delta 0), pack-reused 0
remote: Resolving deltas: 100% (2/2), completed with 2 local objects.
To github.com:WilsonGoGo/gitLearning.git
b650c32..dd187f9 dev -> dev

而alice不知道远程仓库的dev分支已更新,alice仍基于之前的dev分支开发当前的alice分支,并完成了两次commit提交

1
2
3
4
5
6
7
8
9
10
11
12
# 第一次commit
PS ~\aliceWorkspace> " complete" >> .\aliceInfo\workList.txt
PS ~\aliceWorkspace> git add .
PS ~\aliceWorkspace> git commit -m "update : alice workList demo 10"
[alice b32b1eb] update : alice workList demo 10
1 file changed, 0 insertions(+), 0 deletions(-)
# 第二次commit
PS ~\aliceWorkspace> "working on rebase demo" >> task.doc
PS ~\aliceWorkspace> git add .
PS ~\aliceWorkspace> git commit -m "update rebase need to task.doc"
[alice f85fda0] update rebase need to task.doc
1 file changed, 0 insertions(+), 0 deletions(-)

alice尝试更新自己的dev分支

1
2
3
4
5
6
7
8
9
10
11
12
13
14
15
16
17
18
PS ~\aliceWorkspace> git fetch
remote: Enumerating objects: 5, done.
remote: Compressing objects: 100% (1/1), done.
remote: Total 3 (delta 2), reused 3 (delta 2), pack-reused 0
Unpacking objects: 100% (3/3), 306 bytes | 4.00 KiB/s, done.
From github.com:WilsonGoGo/gitLearning
b650c32..dd187f9 dev -> origin/dev
PS ~\aliceWorkspace> git switch dev
Switched to branch 'dev'
Your branch is behind 'origin/dev' by 1 commit, and can be fast-forwarded.
(use "git pull" to update your local branch)
PS ~\aliceWorkspace> git pull origin dev
From github.com:WilsonGoGo/gitLearning
* branch dev -> FETCH_HEAD
Updating b650c32..dd187f9
Fast-forward
task.doc | Bin 174 -> 218 bytes
1 file changed, 0 insertions(+), 0 deletions(-)

可视化结果如下

1663336936128

alice需要将自己之前在alice分支上的改动应用于新的dev分支上(即上图中蓝色分支的新节点)

1
2
3
4
5
6
7
8
9
10
11
12
# 执行rebase指令
PS ~\aliceWorkspace> git rebase dev alice
warning: Cannot merge binary files: task.doc (HEAD vs. f85fda0 (update rebase need to task.doc))
Auto-merging task.doc
CONFLICT (content): Merge conflict in task.doc
error: could not apply f85fda0... update rebase need to task.doc
hint: Resolve all conflicts manually, mark them as resolved with
hint: "git add/rm <conflicted_files>", then run "git rebase --continue".
hint: You can instead skip this commit: run "git rebase --skip".
hint: To abort and get back to the state before "git rebase", run "git rebase --abort".
Could not apply f85fda0... update rebase need to task.doc
#

因为task.doc的修改有冲突,需要手动解决。仍然借助VsCode的冲突编辑器查看冲突,并重新修改内容

1
2
3
4
5
6
7
# 修改完毕后,重新提交commit即可
PS ~\aliceWorkspace> git add .
PS ~\aliceWorkspace> git commit -m "fix conflict in task.doc during rebase"
1 file changed, 0 insertions(+), 0 deletions(-)
# 提交commit后,可以继续执行rebase直至提示完成
PS ~\aliceWorkspace> git rebase --continue
Successfully rebased and updated refs/heads/alice.

最终可视化结果如图所示,可以看到alice分支被续接在新的dev分支节点之后

1663337821662

一、网络测试

参考:Linux 网络设置(ifconfig、route、traceroute、netstat、ss、nslookup、dig) | 航行学园 (voycn.com)

查看网络属性

1
2
3
4
5
6
7
8
9
10
11
12
13
14
15
16
17
# 查看网络接口地址
ifconfig
ip

# 主机名
hostname
hostname <newname>

# 路由条目
route


# ss socket statistics
ss [options]
#-V:–version 显示软件的版本号。 -t:–tcp 显示 TCP 协议的 sockets。 -u:–udp 显示 UDP 协议的 sockets。 -n:–numeric 不解析服务的名称,如 “22” 端口不会显示成 “ssh”。 -l:–listening 只显示处于监听状态的端口。 -p:–processes 显示监听端口的进程。 -a: --all 对 TCP 协议来说,既包含监听的端口,也包含建立的连接。 -r: --resolve 把 IP 解释为域名,把端口号解释为协议名称
$ ss -anpt
1
2
3
4
5
6
7
8
9
10
11
12
13
14
15
16
17
18
19
# netstat
netstat [options]
# -a 显示主机中所有活动的网络连接信息(包括监听、非监听状态的服务端口)
# -n 以数字的形式显示相关的主机地址、端口等信息。
# -r 显示路由表信息。
# -l 显示处于监听(Listening)状态的网络连接及端口信息。
# -t 查看 TCP 相关的信息。
# -u 显示 UDP 相关的信息。
# -p 显示网络连接相关联的进程号、进程名称信息(需 root 权限)。

# 常用
$ netstat -anpt # 显示当前系统中所有的 TCP 连接及对应的进程信息

# 监听端口
netstat -ltunp # All Listening ports
netstat -ltn # Listening TCP ports
netstat -lun # Listening UDP ports
netstat -lx # Listening Unix ports

测试网络连接

1
2
3
4
5
6
7
8
9
10
11
12
# ping 网络连通性
$ ping www.google.com
$ ping www.baidu.com
# 若不能获得从目标主机发回的反馈数据包,则表示在本机到目标主机之间存在网络连通性故障

# traceroute 追踪数据包路由路径
$ traceroute www.baidu.com
$ mtr www.baidu.com

# nslookup 测试dns解析
$ nslookup www.google.com
$ dig @8.8.8.8 baidu.com

二、网络配置

1
2
3
4
5
$ systemctl restart network # 重启网络

vim /etc/resolv.conf # 指定为本机提供 DNS 解析的服务器地址

vim /etc/hosts # 本地主机映射文件

三、网络访问

1.wget

1
2
3
4
5
6
7
8
9
10
11
12
13
14
15
16
wget [选项] URL资源

# -O 重命名下载文件
# -c 断点续传, 继续执行上次未完成任务
# -b 后台下载
wget -O myfile.zip -c -b http://www.example.com/testfile.zip

# -i 多文件下载
wget -i dowload.txt # download.txt文件包含的所有需下载url

# --limit-rate=下载速度 限定下载速度上限, 否则默认占用全部带宽
wget --limit-rate=300k http://www.example.com/testfile.zip
# -Q 下载配额
wget -Q 10m -i dowload.txt # 下载配额为10m
# 下载数据超过了10m会停止后面url的下载
# 配额满足时正在下载的文件会继续下载完成
1
2
3
4
5
6
7
# 密码认证下载
# --http-user=USER 设置 http 用户名为 USER
# --http-password=PASS 设置 http 密码为 PASS
# --ftp-user=USER 设置 ftp 用户名为 USER
# --ftp-password=PASS 设置 ftp 密码为 PASS
wget --http-user=USER --http-password=PASS http://www.example.com/testfile.zip
# P.S. 对于需要证书做认证的网站,就只能利用其他下载工具了,例如curl
1
2
3
4
5
6
7
8
9
10
# -r  递归在下整个站点(www.example.com)资源
# -nd 递归下载时不创建一层一层的目录,把所有的文件下载到当前目录
# 不指定该选项默认按照资源在站点位置创建相应目录
# -np 递归下载时不搜索上层目录,只在当前路径path2下进行下载
# 不指定该选项默认搜素整个站点
# -A <后缀名> 指定要下载文件的后缀名,多个后缀名之间使用逗号进行分隔
# -R <后缀名> 排除要下载文件的后缀名,多个后缀名之间使用逗号进行分隔
# -L 递归时不进入其它主机。不指定该选项的话,如果站点包含了外部站点的链接,这样可能会导致下载内容无限大
wget -r -nd -np -A pdf,png http://www.example.com/path1/path2/ # 只下载path2路径下的所有pdf和png文件, 不创建额外目录全都保存在当前下载目录下

2.curl

1
2
3
4
5
6
7
8
9
10
11
# -o [filename] 把服务器响应输出到指定文件
# -O [filename] 同-o, 但 url 路径最后一个"/"之后的部分作为文件名
curl [-o 自定义文件名|-O] http://www.example.com/index.html

# -C - 自动推测断点的断点续传
# -C <偏移量> 手动设置断点的断点续传
curl -O -C - http://www.example.com/testfile.zip

# --limit-rate 下载速度 限定不超过指定的下载速度
# --max-filesize 下载配额 指定最大可下载文件大小
curl -O -C - --limit-rate 500k --max-filesize 10m http://www.example.com/testfile.zip
1
2
3
4
5
6
7
8
# -i 输出包含响应头信息
# -I 输出仅包含响应头信息,不包含响应内容
# -v 显示一次http通信的整个过程,包括端口连接和http request头信息
# --trace 输出文件 | --trace-ascii 输出文件 在文件中查看额外的通信信息
curl --trace-ascii output.txt http://www.example.com

# -L 自动跳转到重定向链接
curl -L http://a.com # http://a.com会自动跳转至http://b.com(响应状态码3xx), -L让 HTTP请求跟随重定向, 即会返回 "http://b.com" 的响应内容
1
2
3
4
5
6
7
8
9
10
11
12
13
14
15
16
17
18
19
20
21
22
23
24
# HTTP请求头配置

# -X <请求方式> 指定http请求方式(GET|POST|DELETE|PUT等), 默认"GET"
# -H 'kev:value' 添加http请求头, 可以重复-H多次添加多个请求头
curl -X POST \
-H 'Content-Type:application/json' \
-H 'Accept-Language: en-US' \
-H 'Secret-Message: xyzzy' \
http://www.example.com/test

# -b '参数' | --cookie '参数' 设置cookie参数形式key1=value1;...或文件
# -c 文件 把服务器响应的cookie信息写入到文件中
curl -c cookies.txt -b cookies.txt http://example.com
# P.S. 具体cookie值可从http response头的"Set-Cookie"中得到, 可以保存服务器返回的cookie信息到文件, 再用这文件作为下次请求的cookie信息

# -u 'user[:password]' 设置服务器认证的用户名和密码
curl -u 'user[:password]' https://www.example.com
# P.S. 只有用户名时,执行curl后提示输入密码

# -A '代理信息' | --user-agent '代理信息' 设置客户端用户代理, 同-H 'User-Agent:...'
curl -A 'Mozilla/5.0 (Linux; Android 6.0; Nexus 5 Build/MRA58N) AppleWebKit/537.36 (KHTML, like Gecko) Chrome/80.0.3987.149 Mobile Safari/537.36' https://www.example.com # 设置Chrome浏览器

# -e '源网址' | --referer '源网址' 设置来源网址, 同-H "Referer:..."
curl -e '源网址' https://www.example.com
1
2
3
4
5
6
7
8
9
10
11
12
13
14
15
16
17
18
19
# 传递请求参数

# -d '参数' 指定POST请求体, 参数可为 "k1=v1&k2=v2" 或 json串
# 使用-d后, HTTP 请求会自动加上标头"Content-Type:application/x-www-form-urlencoded"
# 且请求自动转为 POST , 可以省略 "-X POST"
# --data-urlencode '参数' 与-d同, 但自动将发送的数据进行URL编码
curl -d '参数' http://www.example.com/test

# 参数请求体为json串
# 需要指定"Content-Type:application/json"
curl -d '{"user":"zhangsan", "password":"123456"}' -H 'Content-Type:application/json' http://www.example.com/login

# 参数内容较多
# 保存至本地文件再发送
curl -d '@requestData.txt' -H 'Content-Type:application/json' http://www.example.com/login

# 以GET方式发送参数
# 直接把参数直接追加url之后
curl http://www.example.com/login?user=zhansan&password=123456
1
2
3
4
5
6
# 上传文件

# -F 'file=@文件;name1=value1;name2=value2;...' 模拟http表单向服务器上传文件, 且请求头会自动添加Content-Type: multipart/form-data
# 参数filename 指定服务器收到文件时文件名
# 参数type 指定文件MIME类型, 默认为application/octet-stream
curl -F 'file=@文件;filename=me.png;type=image/png' https://www.example.com/test

实例

1.VMware虚拟机全局代理

2.设置静态IP

一、grep

1.用法

根据正则表达式查询内容,按行返回匹配结果

1
2
3
4
# 语法
grep [options] search_string path/to/file # 查询文件中的特定字符串
grep [options] search_string file1 file2 ... # 查询多个文件
<other command> | grep [options] search_string # 查询输出流中的特定内容

2.options

  • 返回内容控制

1
2
3
4
5
6
7
8
9
10
11
12
13
14
15
16
17
18
19
20
21
22
23
24
25
26
27
28
29
# -c --count
# 只返回匹配数
$ grep -c error ./*.log # 返回所有.log后缀文件匹配到error的数量
./adservice.log:0
./currencyservice.log:0
./frontend.log:11
./shippingservice.log:0

# -l --files-with-matches
# 返回匹配成功的文件名
# -L --files-without-match
# 返回匹配失败的文件名
# -Z --null
# 指定以0值(\0)字节作为grep输出中的终结符文件名, -Z通常和-l结合使用
$ grep -l ShipOrder ./*.log # 返回当前目录下所有.log后缀文件中,成功匹配到ShipOrder的文件名称
./shippingservice.log

# -n
# 在匹配的内容前显示行号
# --line-number
# 仅打印行号
# --line-buffered
# flush output on every line
$ grep -n error ./*.log # 返回所有.log后缀文件内容中,匹配到error的行以及行号
./frontend.log:26:{"error":"failed to get ads...",...}

# -q --quiet或--silent
# 测试命令是否执行成功,执行成功返回0
grep -q "test" filename
  • 匹配规则控制

1
2
3
4
5
6
7
8
9
10
11
12
13
14
15
16
17
18
19
20
# -i --ignore-case
# 忽略大小写
# --no-ignore-case
# 不忽略大小写(默认模式)
$ echo "hello world" | grep -i "HELLO" # 匹配'hello world'中的hello

# -w --word-regexp
# 只匹配完整单词
# -x --line-regexp
# 只有完整行尝试匹配
$ grep -c -w Ship shippingservice.log
0 # 无单独的完整Ship单词
$ grep -c -x Ship shippingservice.log
0 # 无完整内容为Ship的行
$ grep -c Ship shippingservice.log
157 # 原日志中内容为"message":"[ShipOrder]... , 因此去掉-w和-x才能匹配成功

# -v --invert-match
# 反选
grep -v "info" shippingservice.log # 排除含有info的行
  • 检索模式

1
2
3
4
5
6
7
8
9
10
11
12
13
14
15
16
17
18
19
20
21
22
23
24
25
# -d, --directories=ACTION  
# how to handle directories;
# ACTION is 'read', 'recurse', or 'skip'
$ grep -d skip -c xxx .
# -D, --devices=ACTION
# how to handle devices, FIFOs and sockets;
# ACTION is 'read' or 'skip'
$ grep -D read -c xxx .

# -r --recursive --directories=recurse
# 在子目录内递归搜索
$ grep -r -c main *.go # 在当前目录下,递归查找所有.go后缀文件中,成功匹配main的次数
deployment_details.go:1
handlers.go:1
main.go:2
middleware.go:1
rpc.go:1
$ grep -r -n -C 2 main *.go # 在当前目录下,递归查找所有.go后缀文件中,成功匹配到main的前后2行以及行号
deployment_details.go:1:package main
deployment_details.go-2-
deployment_details.go-3-import (
--
...


  • 匹配结果显示设置

1
2
3
4
5
6
7
8
9
10
11
12
13
# -A num 显示所有匹配行以及其后num行
# -B num 显示匹配行以及其前num行
# -C num 显示匹配行以及其前后各num行
$ grep -C 1 1676941012528 currencyservice.log
{"level":30,"time":1676941012527,...}
{"level":30,"time":1676941012528,...}
{"level":30,"time":1676941012529,...}

# -m num 显示匹配成功的前num行内容
$ grep -C 2 1676941012528 currencyservice.log
{"level":30,"time":1676941012528,...}
  • 正则式设置

1
2
3
4
5
6
7
8
9
10
11
12
13
14
15
16
17
18
19
20
21
22
23
24
25
26
27
28
29
30
31
32
33
34
# 用于匹配的PATTERNS的规则
$ ls | grep PATTERN # PATTERN作为匹配正则式
$ ls | grep 'PATTERN STRING' # PATTERN STRING作为匹配正则式
# 内可包含空格
# 单双引号均可

# -G, --basic-regexp
# PATTERNS are basic regular expressions
# 默认模式,可省略-G
$ grep ^1[34578][0-9] telephone_number.txt
13611778887 # 匹配136
13697156332 # 匹配136
13339987 # 匹配133
1369715633X # 匹配136

# -E, --extended-regexp
# PATTERNS are extended regular expressions
$ grep -E ^1[34578][0-9]{9}$ telephone_number.txt
13611778887 # 匹配13611778887
13697156332 # 匹配13697156332

# -F, --fixed-strings
# PATTERNS are strings
$ grep -c -F ^136 telephone_number.txt
0 # ^136被用作固定字符
$ grep -c ^136 telephone_number.txt
3 # ^136中^作为行首匹配使用

# -P, --perl-regexp
# PATTERNS are Perl regular expressions
#-e, --regexp=PATTERNS
# use PATTERNS for matching
# -f, --file=FILE
# take PATTERNS from FILE

二、find

1.用法

find用于检索文件的属性,如文件名、文件类型、文件大小等(相对的grep是对文件内容进行检索)

1
2
3
4
5
6
7
# 递归查找path路径下符合要求的文件
$ find [path...] [options] [expression]

# 可以查找多个目录
$ find /opt /usr /var -name foo.scala -type f
# 可以添加多个检索条件
$ find . -type f \( -name "*.sh" -or -name "*.txt" \) # 查找.sh .txt的文件

2.option

  • 检索规则

1
2
3
4
5
6
7
8
9
10
11
12
13
14
# -regex 使用正则表达式检索
$ find . -regex '.*/log/.*log'
./log/productcatalogservice.log
./log/shippingservice.log
./log/checkoutservice.log

# -maxdepth 最大目录深度
# -mindepth 最小目录深度
$ find . -maxdepth 1 -name '*.log' # 仅查找当前目录
$ find . -mindepth 2 -name '*.log' # 仅查找子目录
./log/productcatalogservice.log
./log/shippingservice.log
./log/checkoutservice.log

  • 按文件名检索

1
2
3
4
5
# -name 	按名称查找文件
# -iname 按名称查找文件, 不区分大小写
$ find . -name "*.txt" # 查找txt后缀文件
$ find . -name "2020*.csv" # 查找2020x的.csv文件
$ find . -name "json_*" # 查找json_xxx名的文件
  • 按文件类型检索

1
2
3
4
5
6
7
8
9
10
11
12
# -type 
# d: 目录
# f: 一般文件
$ find . -type d -empty # 列出空目录
$ find . -type f -empty -delete # 删除所有空文件
# c: 字型装置文件
# b: 区块装置文件
# p: 具名贮列
# l: 符号连结
# s: socket


  • 按权限检索

1
2
3
4
5
6
7
8
9
10
11
# -perm 按rwx权限检索
$ find . -type f ! -perm 777 # !表示检索非777文件
$ find . -type f -perm 644 -exec ls -l {} \
# 查找当前目录中普通文件
# user具有读、写权限
# group用户和其他用户具有读权限

# -user 文件所有者用户
# -group 文件所有者所在群组
$ find /home -user wilson
$ find /home -group developer
  • 按大小检索(+/-表示范围)
1
2
3
4
5
6
# -size 按大小检索
# b 512字节块(default)
# c/k/M/G 字节/kb/MB/GB/
# T/P TB(仅BSD)/PB(仅BSD)
find / -type f -size 0 -exec ls -l {} \
# 查找系统中所有文件长度为 0 的普通文件,并列出它们的完整路径
  • 按时间检索(+/-表示范围)
1
2
3
4
5
6
7
# -ctime 访问时间(上次文件打开)
# -mtime 修改时间(上次文件内容被修改)
# -ctime 更改时间(上次文件 inode 已更改)
find . -ctime 20 # 最近20天内更新
find . -ctime -6h30m # 文件状态6小时30分内变化
find . -atime -1 # <24小时前访问过(同-atime 0)
find . -mtime +1w # 修改时间超1周

3.复杂操作示例

1
2
3
4
5
6
7
8
9
10
11
# 查找并删除,删除前需询问
find /var/log -type f -mtime +7 -ok rm {} \
# 更改时间在 7 日以前的普通文件

# 查找并排序
$ find . -printf "%T+\t%p\n" | sort
$ find . -printf "%T+\t%p\n" | sort -r

# 查找并chmod
$ find / -type f -perm 0777 -print -exec chmod 644 {} \; # 查找文件并将权限设置为 644
$ find / -type d -perm 777 -print -exec chmod 755 {} \; # 查找目录并将权限设置为 755

三、awk

1.用法

awk用来处理文本,将文本按照指定的格式输出。其中包含了变量,循环以及数组

1
2
3
4
5
awk [选项] 'awk脚本' [处理文本路径]
# 常用options选项:
# -F :指定描绘一行中数据字段的文件分隔符,默认为空格(即指定行的分隔符)
# -f file:指定读取程序的文件名,就是将awk的命令放到文本中用-f选项调用
# -v var=value:定义awk程序中使用的变量和默认值

2.awk脚本

参考: 18个awk的经典实战案例 | 骏马金龙 (junmajinlong.com)

脚本使用方法

1
2
3
4
5
6
7
8
9
10
11
12
13
14
15
16
17
18
19
# awk脚本,规则如下
BEGIN {<初始化>}
<pattern 1> {<计划动作>}
<pattern 2> {<计划动作>}
...
# 对每次匹配pattern1成功的行执行的计划动作
# 可以使用多条动作
# 不使用pattern默认对每行使用
END {< 最后的动作 >}

# 使用字符串作为awk脚本
$ awk -F, \
'BEGIN {print "Error logs : "} \
/("severity":"info")/ {print $NF} \
END {print "End"}' ./*.log

# 使用.awk脚本文件作为awk脚本
awk -f <文件名> [待处理文件]
$ awk -f demo.awk /etc/passwd

输入控制

1
2
3
4
5
6
7
8
9
10
11
12
13
14
15
16
17
18
19
20
21
22
23
24
25
26
27
28
29
30
# options选项设置行内字段分隔符,默认为逗号,
-F: # 以:作为分隔符
# 逐行打印passwd内第一个字段与最后一个字段
$ awk -F: '{print NR: $1, $NF} \
END{print "end of " FILENAME}' /etc/passwd | tail -n 5
root /bin/bash
daemon /usr/sbin/nologin
...
# -F: 表示用冒号:作为分隔符来识别各列
# '{print NR: $1, $NF}' 为处理程序
# {...} {}内表示逐行处理
# NR 当前行号
# NF 当前行字段数
# $1 表示每行的第一个字段
# $NF 表示每行的最后一个字段
# /etc/passwd 表示待处理的文件

$ awk -F":" '{print NR ":" $1, $NF} \
END{print "end of file : " FILENAME}' /etc/passwd \
| sort | tail -n 5
6:games /usr/sbin/nologin
7:man /usr/sbin/nologin
8:lp /usr/sbin/nologin
9:mail /usr/sbin/nologin
end of/etc/passwd
# -F":" 分割符:
# {print NR ":" $1, $NF} 打印行号NR, 打印字符串 : , 打印首尾字段
# END{print "end of file : " FILENAME}' 结尾行打印文件名
# | sort 打印的各行排序
# | tail -n 5 只显示排序后的末尾5行
1
2
3
# awk脚本内设置分隔符
FS=":" # 行内分隔符设置为冒号":", 默认为逗号","
RS="" # 行间分隔符设置为空行, 默认为换行符"\n"

输出控制

1
2
3
4
5
6
7
8
# 指定位置输出字段
$ awk -F: NR==2'{print $1, $(NF-1), $NF}' /etc/passwd
daemon /usr/sbin /usr/sbin/nologin
# -F: 指定字段分隔符
# NR==2 只对第2行内容执行后续操作
# $0 输出所有字段
# $1 每行第一字段
# $NF, $(NF-1) 每行最后字段与倒数第二字段
1
2
3
4
5
6
7
8
9
10
11
12
13
14
15
# 指定字段内容输出范围

$ cat a.txt
16 001agdcdafasd
16 002agdcxxxxxx
23 001adfadfahoh
23 001fsdadggggg

# 指定每行第二个字段只输出前3个字符
$ awk '{print $1,substr($2,1,3)}' #
$ awk 'BEGIN{FIELDWIDTH="2 2:3"}{print $1,$2}' a.txt
16 001
16 002
23 001
23 002
1
2
3
4
5
6
7
8
9
10
11
12
13
14
15
16
17
18
19
20
21
22
23
24
25
# 格式化输出print与printf

# print 在显示多个结果时以OFS分隔行内变量,以ORS作行间分隔
OFS 输出的列间隔符,默认为tab;
ORS 输出的行间隔符,默认为\n
OFS=",\t" # 在输出各字段后加上逗号
ORS=";\n" # 在输出各行末尾加上;再换行

# printf可更灵活控制某字段输出格式
# 格式控制 %s
$ awk 'BEGIN{printf "|%10s|\n", "hello"}'
| hello| # %10s右对齐,定长10字符长度
$ awk 'BEGIN{printf "|%-10s|\n", "hello"}'
|hello | # %-10s左对齐,定长10字符长度
# 浮点数控制 %f %E %e
$ awk 'BEGIN{sum=0} {sum+=$1} \
END{printf(“%f\n”,sum)}' test.txt 214449.110000 # 默认保留六位小数
$ awk 'BEGIN{sum=0} {sum+=$1} \
END{printf("%.2f\n",sum)}' test.txt 57760731.18 # 指定小数位数
$ awk 'BEGIN{sum=0} {sum+=$1} \
END{printf("%12.2f\n",sum)}' test.txt 57760731.18 # 指定位数过多,前面补空格
# ASCII字符 %c
# 十进制整数 %d
# 无符号八进制 %o

1
2
3
4
5
6
7
8
9
10
11
12
13
14
# 格式化文本

$ cat a.txt
aaaa bbb ccc
bbb aaa ccc
ddd fff eee gg hh ii

# 移除每行的前缀、后缀空白,并将各部分左对齐
$ awk 'BEGIN{OFS="\t"}{$1=$1;print}' a.txt
aaaa bbb ccc
bbb aaa ccc
ddd fff eee gg hh ii
# BEGIN{OFS="\t"} 输出字段分隔符(OFS)为tab
# {$1=$1;print} 各字段保持不变,并打印

逻辑控制

1
2
3
4
5
# 正则表达式匹配行
/regex/ # 行匹配
!/regex/ # 行不匹配
$1 ~ /regex/ # 字段匹配
$1 !~ /regex/ # 字段不匹配

常用awk函数

1
2
3
4
5
6
7
8
9
10
# 将 $0 设置为当前输入文件中的下一个输入记录
getline # 即读入下一行

# 0 到 1 之间的随机数
rand
# 为 rand 设置种子并返回之前的种子
srand

# 将 x 截断为整数值
int(x)
1
2
3
4
5
6
7
8
9
10
11
12
13
14
15
16
17
18
19
20
21
22
23
# 字符串 s 的长度(如果没有arg,则为 $0)
length(s)

# 大小写转换
tolower(s) # 字符串 s 转小写
toupper(s) # 字符串 s 转大写

# 字符串 s 中出现字符串 t 的位置,未找到为 0
index(s,t)
# 字符串 s 中出现正则表达式 r 的位置,未找到为 0
match(s,r)
# 返回从index开始的 s 的len长子字符串(1开始计数)
substr(s,index,len)

# 将字符串 s 拆分为数组 a 由 fs 拆分
# 返回 a 的长度
split(s,a,fs)

# 将 t 替换为字符串 s 中第一次出现的正则表达式 r
# (如果未给出 s,则替换为 $0)
sub(r,t,s)
# 用 t 替换字符串 s 中所有出现的正则表达式 r
gsub(r,t,s)

去重与统计功能

1
2
3
4
5
6
7
8
9
10
11
12
13
14
15
16
17
18
19
# 去重功能

$ cat a.txt
2019-01-13_12:00_index?uid=123
2019-01-13_13:00_index?uid=123
2019-01-13_14:00_index?uid=333
2019-01-13_15:00_index?uid=9710
2019-01-14_12:00_index?uid=123
2019-01-14_13:00_index?uid=123
2019-01-15_14:00_index?uid=333
2019-01-16_15:00_index?uid=9710

# 按uid值去重
$ awk -F"?" '!arr[$2]++{print}' a.txt
2019-01-13_12:00_index?uid=123
2019-01-13_14:00_index?uid=333
2019-01-13_15:00_index?uid=9710
# -F"?" ?作为字段分割符
# !arr[$2]++ {print} 匹配条件:每行的第二个字段(即uid值)重复时就不打印该行; 其中arr[$2]++用于记录出现次数
1
2
3
4
5
6
7
8
9
10
11
12
13
14
15
16
17
18
19
20
21
22
23
24
25
26
27
28
29
30
31
32
33
34
35
36
37
38
39
40
41
42
43
44
45
# 统计功能

# 统计行数
awk 'END{printf NR \n}' a.txt
# NR 记录总数

# 统计各重复项数目
$ awk '{arr[$1]++} \
END {OFS="\t"; \
ORS=";\n";\
for(idx in arr) \
{print arr[idx],idx}}' a.txt
6 portmapper
2 nfs_acl
5 nlockmgr
2 status
4 nfs
6 mountd

# 统计多项数据:awk脚本的子数组实现
{ a[$1][$2]++ }
END{
# 遍历数组,统计每个ip的访问总数
for(ip in a){
for(uri in a[ip]){
b[ip] += a[ip][uri]
}
}
# 再次遍历
for(ip in a){
for(uri in a[ip]){
print ip, b[ip], uri, a[ip][uri]
}
}
}
# 统计多项数据:awk脚本的复合索引实现
{ a[$1]++; b[$1"_"$2]++; }
END{
for(i in b){
split(i,c,"_");
print c[1],a[c[1]],c[2],b[i]
}
}


筛选功能

1
2
3
4
5
6
7
8
9
10
11
12
13
14
15
16
17
18
19
20
21
22
23
24
# 读取特定段落

# 读取.ini 配置文件中的某段
$ cat a.ini
>[base]
...

[mysql]
name=mysql_repo
vaseurl=http://xxx/...

enable=1

[...]
...
# 读取 [mysql] 段落的awk脚本
BEGIN{RS=""} # 按段落划分行
/\[mysql\]/ # 正则匹配(\[...\]中[]需要用\转译)
{
print;
while( (getline)>0 ) # 利用getline进入后续行继续判断,防止漏掉上文中的enable=1
{ if(/\[.*\]/) { exit } } # 如果遇到其他[...]开头,停止打印
print;
}
1
2
3
4
5
6
7
8
9
10
11
12
13
14
15
16
17
18
19
20
21
22
23
24
25
26
27
28
29
30
# 筛选时间范围内日志

# mktime() 转换timestamp值
$ awk 'BEGIN{print mktime("2019 11 10 03 42 40")}'
1573328560

# 时间筛选awk脚本
BEGIN { which_wime = mktime("2019 11 10 03 42 40") }
{
# 匹配时间字符串
match($0, "^.*\\[(.*)\\].*")
# 字符串转timestamp
tmp_time = strptime2(arr[1])
# 通过timestamp筛选
if(tmp_time > which_time){ print }
}

# 构建的时间字符串格式为:"10/11/2019:23:53:44+08:00"
function strptime2(str ,dt_str,arr,Y,M,D,H,m,S) {
dt_str = gensub("[/:+]"," ","g",str)
# dt_sr = "10 11 2019 23 53 44 08 00"
split(dt_str,arr," ")
Y=arr[3]
M=arr[2]
D=arr[1]
H=arr[4]
m=arr[5]
S=arr[6]
return mktime(sprintf("%s %s %s %s %s %s",Y,M,D,H,m,S))
}

行处理与列处理功能

1
2
3
4
5
6
7
8
9
10
11
12
13
14
15
16
17
18
19
20
21
22
23
24
25
26
27
28
29
30
# 行列转换awk脚本
{
for(i=1;i<=NF;i++){
if(!(i in arr)){ arr[i]=$i }
else { arr[i]=arr[i]" "$i }
}
}
END{
for(i=1;i<=NF;i++){ print arr[i] }
}

# 第一列相同时,将第二列数据合并至同一行

# awk脚本
{
if($1 in arr){ arr[$1] = arr[$1]" "$2 } # 如果第一列已记录,将第二列续接至已有数据
else { arr[$1] = $2 } # 第一列未记录,直接存入当前第二列数据
}
END{
for(i in arr){ printf "%s %s\n",i,arr[i] }
}
# 处理效果
74683 1001
74683 1002
74683 1011
74684 1000
74684 1001
>>>
74683 1001 1002 1011
74684 1000 1001 1002

四、sed

五、组合使用例

1.查询容器名并用作后续指令

1
2
3
4
5
6
7
8
9
10
11
12
13
14
15
16
17
18
19
#!/bin/bash

# 目标命令模板
# kubectl exec
# --namespace example-namespace
# example-pod -c second-container
# -- cat /tmp/example-file > local-file

# 目标查询结果
# wilson@ubuntu:~/workspace/microservices/microservices-demo$ kubectl get pods
# NAME READY STATUS RESTARTS AGE
# adservice-6fb9779796-l7bxm 1/1 Running 0 4m18s
# cartservice-6557d5b47d-c229p 1/1 Running 0 4m18s
# ...
# shippingservice-6975d4b698-rr9nq 1/1 Running 0 4m17s

# POD_NAME每次会有随机生成的后缀,因此需要先查询再在目标命令中使用
POD_NAME=`kubectl get pods | grep adservice | awk '{print $1}'`
kubectl exec --namespace default $POD_NAME -c server -- cat /app/log/adservice/log.txt > ./adservice.log

2.删除没有error级别日志的日志文件

1
2
3
4
$ grep -r "error" . -LZ | xargs -0 rm
# -r 表示在当前目录.下递归搜索
# -LZ 表示返回匹配error失败的文件名,并用0值字节(\0)分隔
# xargs -0 rm 读取输入并用0值字节(\0)终结符分隔文件名,然后删除匹配文件

3.

1
2
3
4
5
6
# 打印passwd中第一列内容,即所有用户名
$ cat /etc/passwd | awk -F: '{print $1}'
root
daemon
...

一、介绍

LaTex核心是将文字与排版区分开,就像html和css那样。
LaTex可以在文章中插入各种图片,符号,公式,乐谱甚至动画。也可以通过修改代码,将文章排版风格快速改变。
LaTex与markdown相比,markdown更加轻量级,语法包体积小。

二、安装与使用

1.在线使用overleaf

Overleaf, Online LaTeX Editor

通过overleaf网站在线使用LaTex编辑

2.本地安装

常用发行版有:TeX Live & MiKTeK

3.VsCode配置LaTex

安装LaTeX Workshop插件

配置参考: VScode配置Latex环境(VScode+texlive)_今天没有吃可爱多的博客-CSDN博客_texlive+vscode

在vscode内执行view latex命令即可打开latex预览窗口

待整理: 一个非常快速的 Latex 入门教程_哔哩哔哩_bilibili

文档: https://github.com/CTeX-org/lshort-zh-cn

一、注释

1
2
3
4
5
6
7
8
9
10
11
12
13
14
% 使用%可以单行注释

% 使用verbatim宏包
\usepackage{verbatim}
\begin{comment}
这里的内容均为注释内容
可以实现多行注释
\end{comment}

% 使用 \iffalse .... \fi 语句进行注释
\iffalse
这里的内容均为注释内容, 虽然编辑时显示形同正文, 但是编译时会自动忽略该部分
同样可以实现多行注释
\fi

二、前言 Preamble

位于\begin{document}之前的内容为前言内容, 其功能如下:

1.指定文档格式

通过documentclass指定文档类型, 这应当是LaTex文章的首行内容

1
2
3
4
\documentclass{article} % 普通文章格式, 最常使用
\documentclass{book}
\documentclass{report}
\documentclass{beamer} % 幻灯片格式

中英混杂时需要使用以下格式

1
2
3
\documentclass[UTF8]{ctexart} 
% ctexart格式支持中英文混杂
% 指定UTF8编码类型(UTF8是TeXworks编辑器默认编码类型), 防止中文乱码

2.指定页面尺寸

参考: LaTeX 页面大小和页边距_Xovee的博客-CSDN博客_latex 页边距

1
2
3
4
5
6
7
8
9
10
% 页面默认尺寸为A4纸

% 创建一个大小为 A4 的文档,它的文本区域的大小为6英寸宽和8英寸高
\usepackage[a4paper, total={6in, 8in}]{geometry}

% 使用 legal 页面大小、横向的(landscape orientation)、边距为 2 英寸的文档
\usepackage[legalpaper, landscape, margin=2in]{geometry}
% 或分步传参
\usepackage{geometry}
\geometry{legalpaper, landscape, margin=2in}

3.导入宏包

1
2
\usepackage{graphicx} % Required for inserting images
\usepackage{verbatim} % Required for using comment

4.标题 作者 日期

标题、作者、日期在前言部分起设置作用(多次声明时仅最后一次设置起效)

1
2
3
4
% 直接显示括号内内容
% 多次设置时最后一次设置生效
\title{title}
\author{author}
1
2
3
4
5
6
7
8
9
10
11
12
13
14
15
16
17
18
% 不显示日期
\date{}
% 指定日期
\date{February 2023} % 里面写什么显示什么
\date{12 February 2023} % 多次设置时最后一次生效
% 使用当天日期
\date{\today} % 在\documentclass[UTF8]{ctexart}格式下不可用


% 日期带数学符号
\usepackage{amsmath} % 引入宏包
\date{October 1$^\text{th}$, 2020} % 使用公式语法

% 中文日期
\usepackage{CJK, CJKnumb} % 引入宏包
\begin{CJK*}{GBK}{kai} % 在包内设置日期
\date{2020年10月1日}
\end{CJK*}

只有在正文中使用命令, 才会将设置的标题, 作者, 日期生成在命令处

1
2
3
4
% document区域内才是正文
\begin{document}
\maketitle % 该命令用于生成文章标题, 作者, 日期
\end{document}

三、章节控制

1.正文

1
2
3
\begin{document}
% document区域内为文章正文,会被编译成最终的pdf
\end{document}

2.章节与子章节

1
2
3
4
5
6
7
8
9
10
11
\begin{document}
% 创建章节
\section{section name}
some content ...
% 创建子章节
\subsection{subsection name}
some content ...
% 创建子子章节
\subsubsection{subsubsection name}
some content ...
\end{document}
1
2
3
4
5
6
\begin{document}
% 书籍排版时, 可以使用part chapter
% 如: /documentclass[UTF8]{ctexbook}
/part{part one} % 表示书籍中的第x部
/chapter{chapter one} % 表示书籍中的第x章
\end{document}

3.换行与缩进

1
2
3
4
5
6
7
8
9
10
11
12
13
14
15
\begin{document}
% 单独的换行符 : 空格
% 连续两个换行符 : 换行
line1
line2

line3
% 最终效果:
% line1 line2
% line3

% par命令也可以用于开始新段落
This is first paragraph. \par
This is second paragraph
\end{document}
1
2
3
4
5
6
7
8
9
10
\setlength{\parindent}{4em} % 设置段落缩进大小, 1em为一个字母宽度
\setlength{\parskip}{1em} % 设置段落间距
% 设置行间距(三选一)
\renewcommand{\baselinestretch}{1.5} % 1.5表示设置为默认的1.5倍
\setlength{\baselineskip}{value} % value表示默认行距倍数
\linespread{value} % value取1.0 1.3 1.6分别表示单倍行距 一倍半行距 双倍行距
\begin{document}
This is first paragraph. \par % 默认情况下,LaTeX 不对章或者节内的第一个段落进行缩进
This is second paragraph % 后续段落会自动缩进
\end{document}

四、字体控制

1
2
3
4
5
\begin{document}
% 粗体字 bold font : \textbf{}
% 斜体字 italic : \textit{}
\textbf{bold content}, normal text, \textit{italic content}, \underline{underline}
\end{document}